How To Add and Remove a Header in Google Docs: A Step-by-Step Guide
It’s crucial for lengthy documents such as employee handbooks, safety guides, and other important organizational documentation to be organized logically to make your document more scannable for readers. Make your Google documents easier to scan by adding headers to each section in your document. The processes for adding and removing headers are simple.
In this article, you will learn the following:
How to add, close, and reopen headers in Google Docs (desktop)
How to add, close, and reopen headers in Google Docs (mobile)
How to add, close, and reopen headers in Google Docs (desktop)
Follow these simple steps to learn how to add, close, and reopen headers in a Google Doc on your desktop:
1. Open Google Docs on your web browser.
2. Open the Google document that you would like to add a header to.
3. Select the “Insert” tab from the top toolbar.
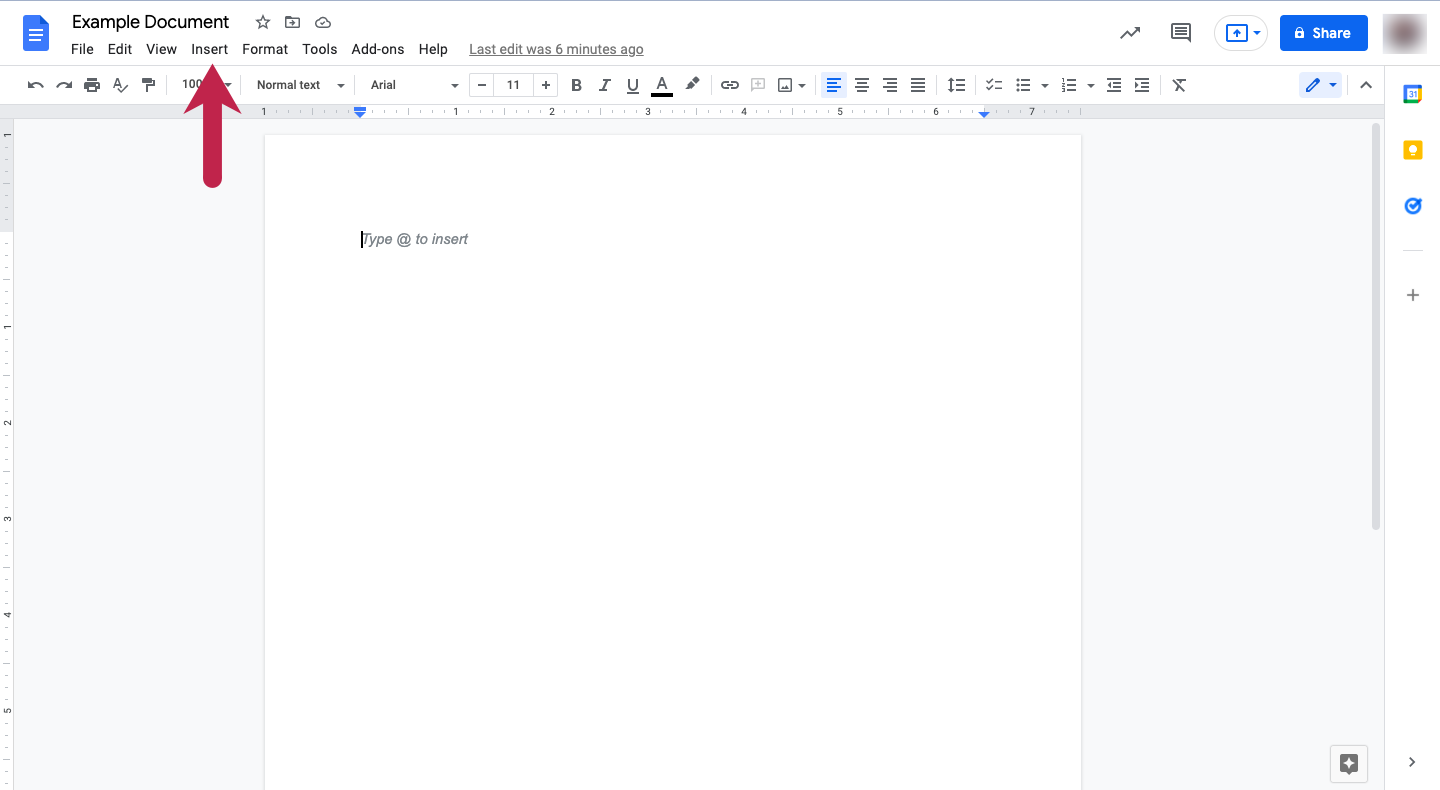
From the top toolbar (located at the very top of the screen), select the “Insert” tab.
4. Click “Headers & footers” from the drop-down menu.
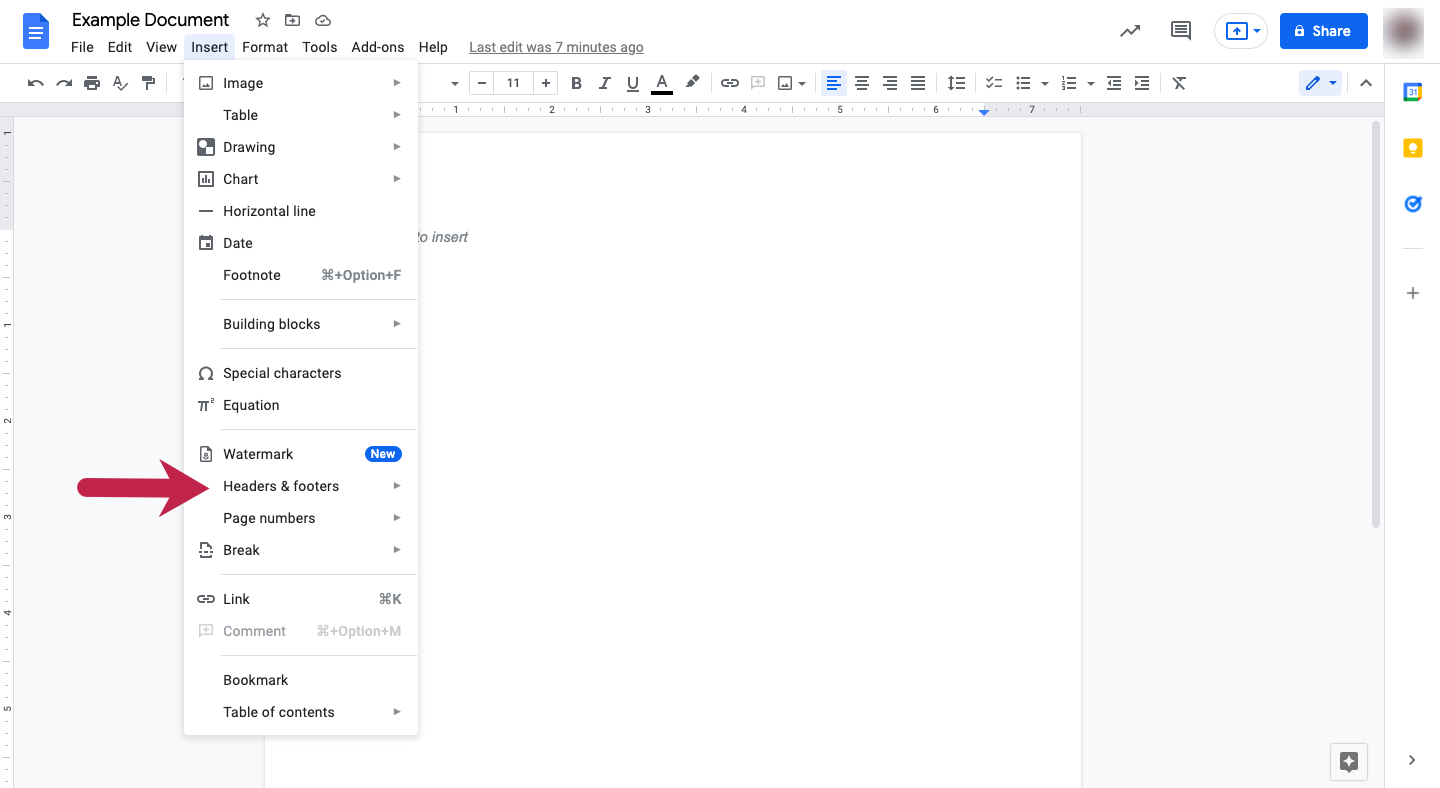
From the drop down menu, select the “Headers & footers” option.
5. Select “Header.”
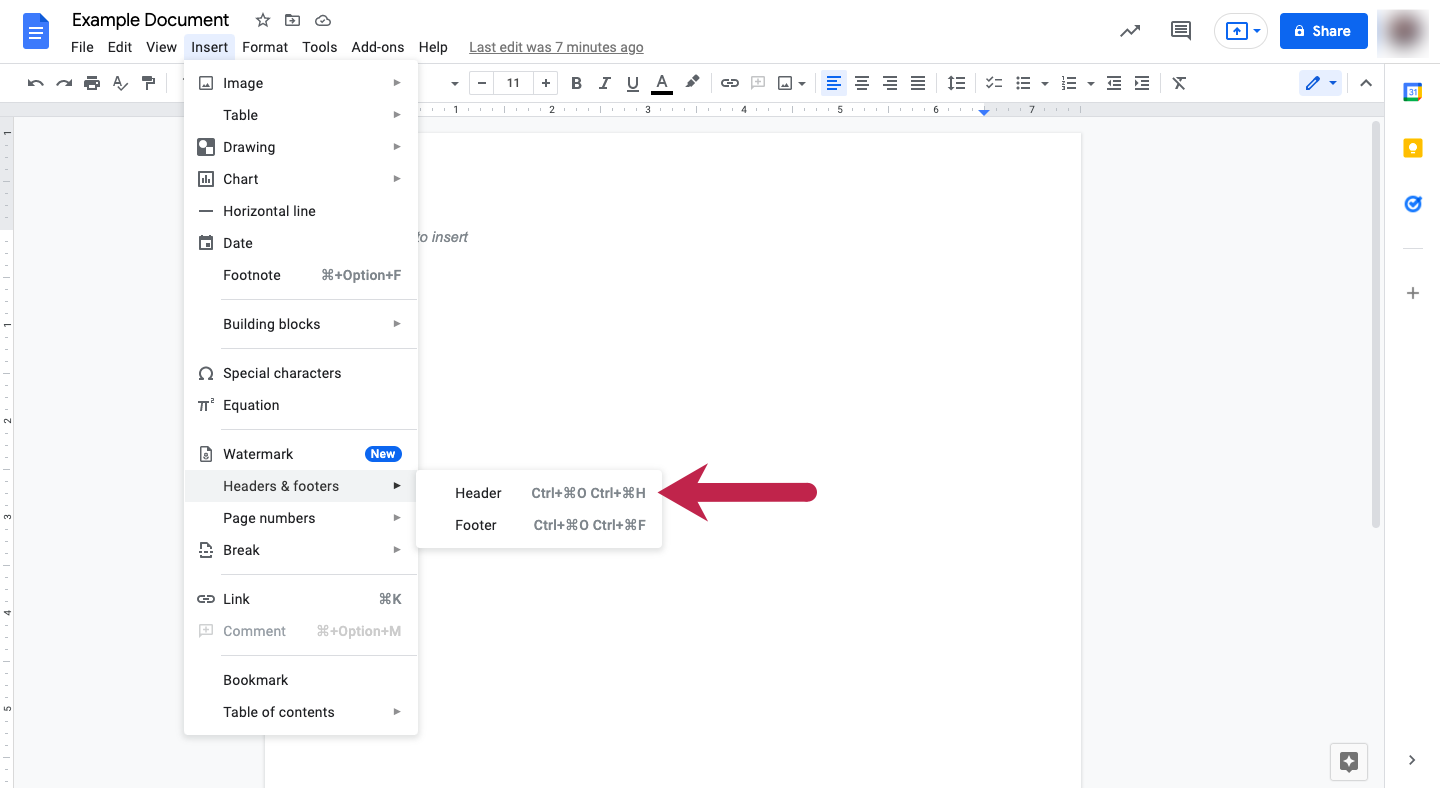
Select “Header” from the side tab.
6. Click anywhere within the header area, and type your header.
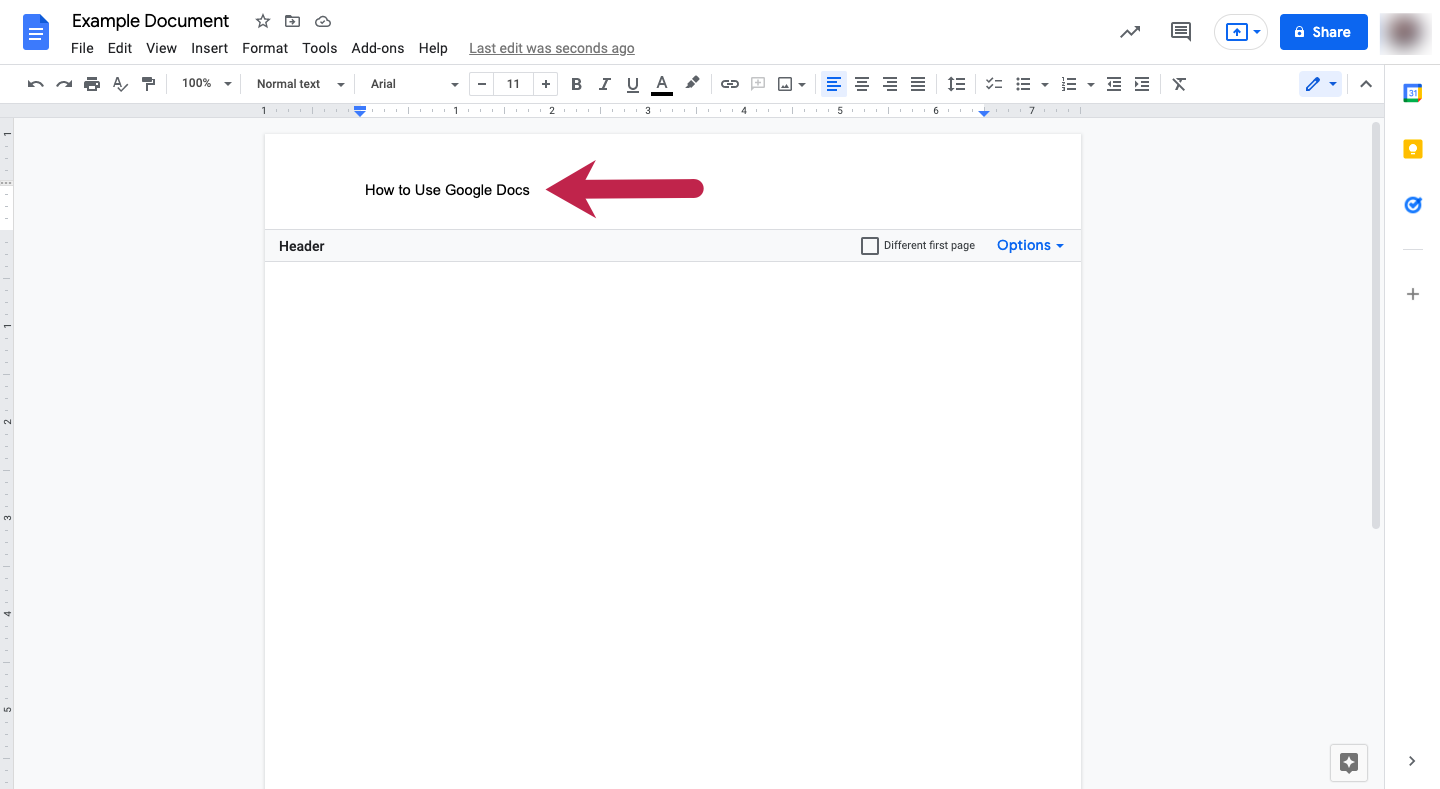
Click anywhere inside of the header to pull up your cursor, then type your header.
7. Once you finish typing your header, click anywhere within the Google Doc (outside of the header area) to save and close the header.
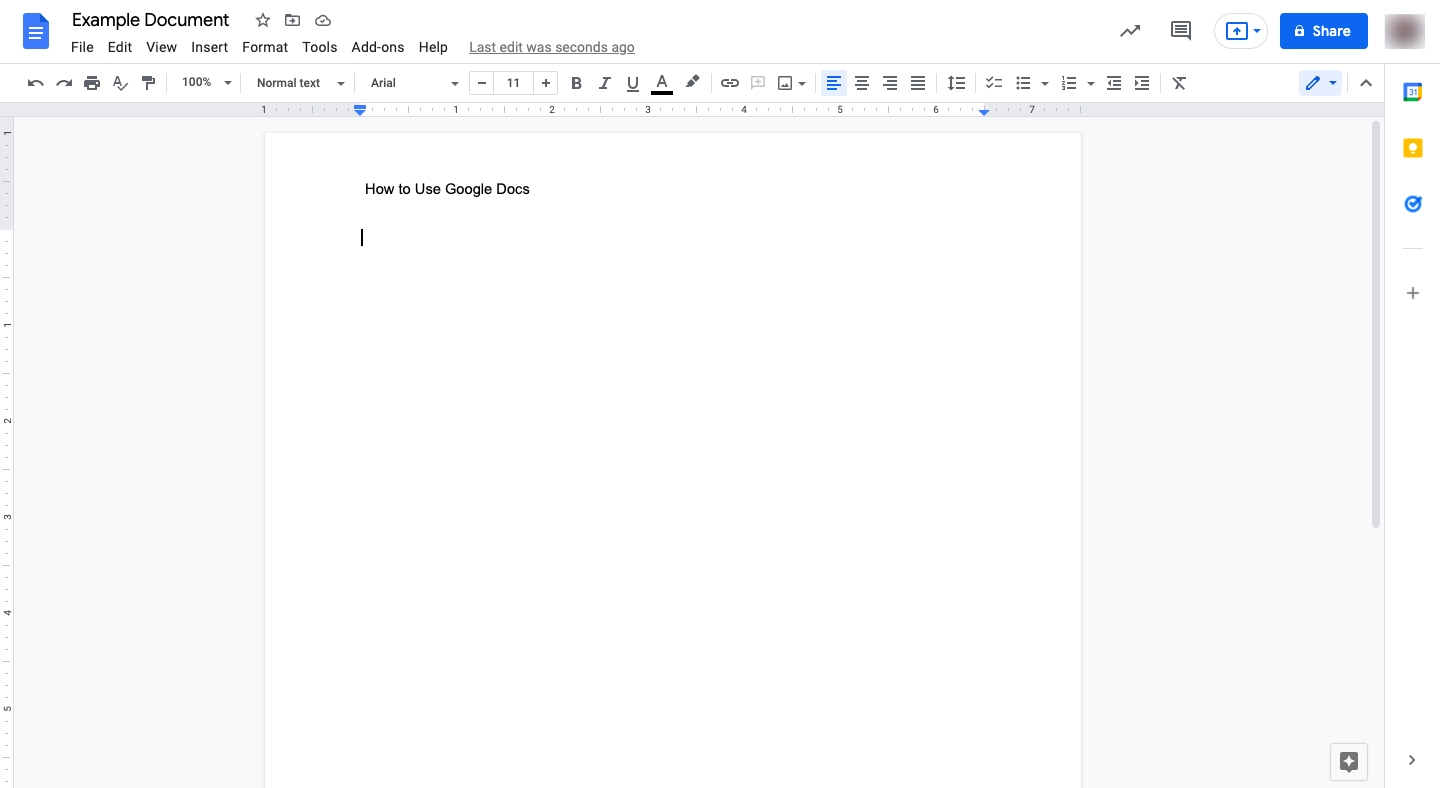
To close the header editing panel, click anywhere on the document.
8. To reopen your header, either repeat steps three through five, or use one of the following keyboard shortcuts:
On a Mac computer: Press Ctrl + Cmd + O or Ctrl + Cmd + H
On a Windows or ChromeOS computer: Press Ctrl + Alt + O or Ctrl + Alt + H
How to customize and remove headers from a Google Doc (desktop)
How to customize headers on a Google Doc (desktop)
Google Docs allows you to access various header customization options such as modifying margins, adding page numbers, and assigning headers to different page numbers.
Modify the margins
If you would like to modify the margins of a header, follow these instructions:
1. Within the header editing window, select the “Options” button.
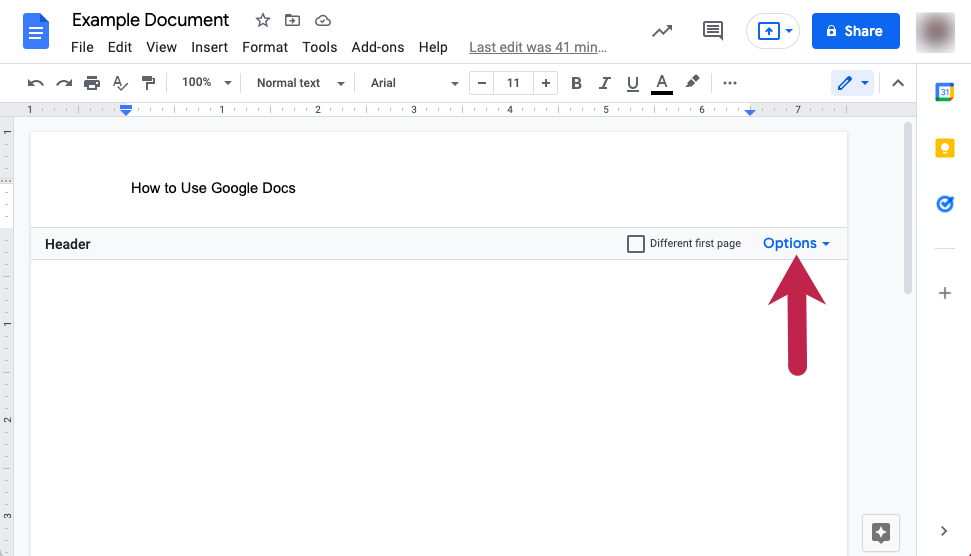
Click on the “Options” button to open the header options menu.
2. Click “Header format.”
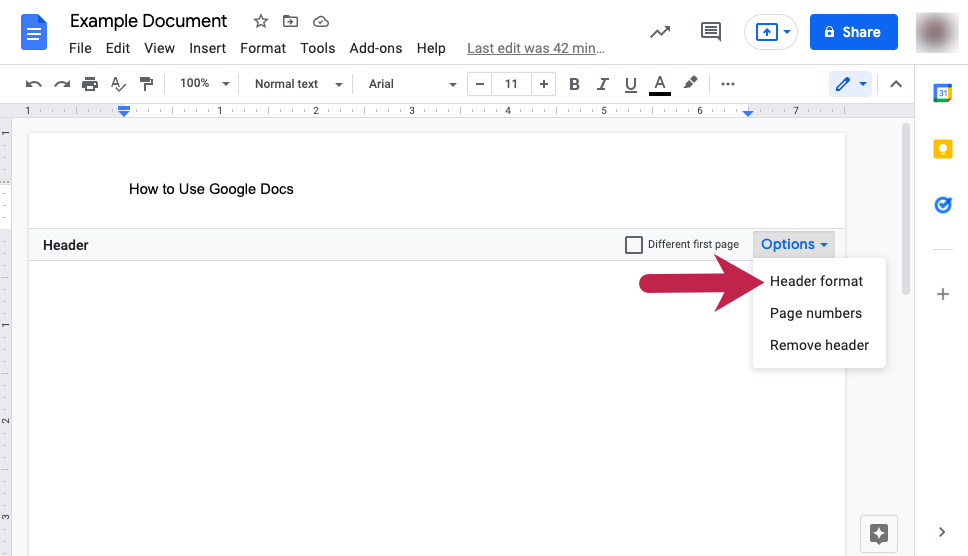
From the drop-down menu, select “Header format.”
3. In the pop-up window, type the margin height that you would like in the top text field, and select the blue “Apply” button at the bottom right.
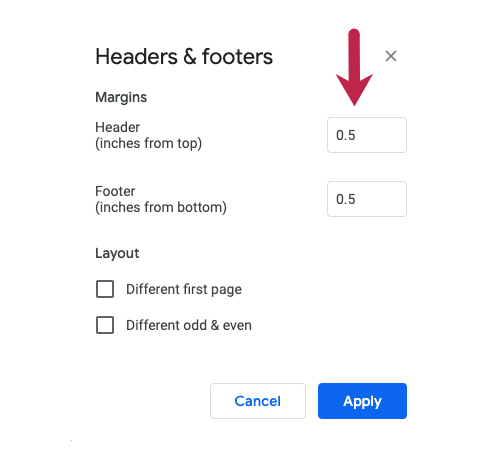
In the top text field, type the number of inches from the top of the page at which you would like your header to sit. Select “Apply” when complete.
Assign headers to different pages (desktop)
If you would like the first page of your document to have a different header, check the “Different first page” checkbox under the “Header format” window. You can also assign different headers for odd and even pages on your document. To do so, follow these instructions.
1. Select the “Options” button, then click the “Header format.”
2. In the pop-up window, under the “Layout” section, select the “Different odd & even” checkbox, then hit “Apply.”
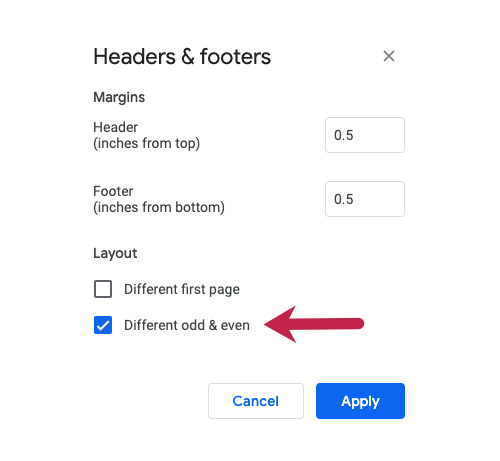
Select the checkbox next to the “Different odd & even” option under the “Layout” section.
Add page numbers to a header (desktop)
1. Select the “Options” button on the header editing panel.
2. Click “Page Numbers.”
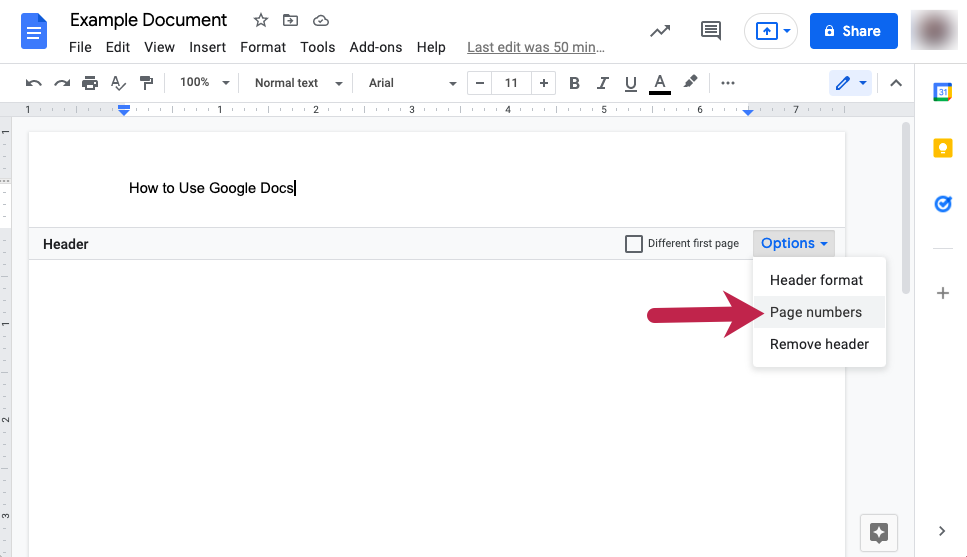
From the drop-down menu, select the “Page numbers” option.
3. Select “Header.”
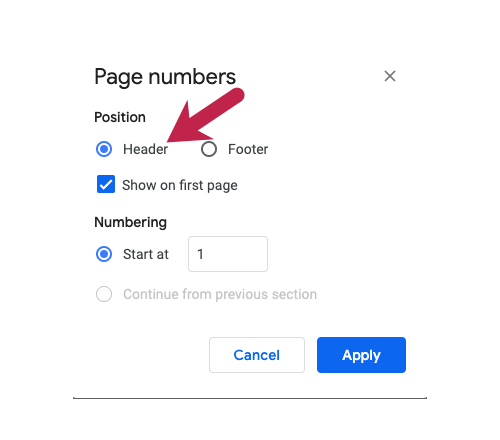
Click the “Header” option to ensure you are applying customization to the header.
4. Select “Start at”, then type the page number you’d like to start the header at, and click “Apply.”
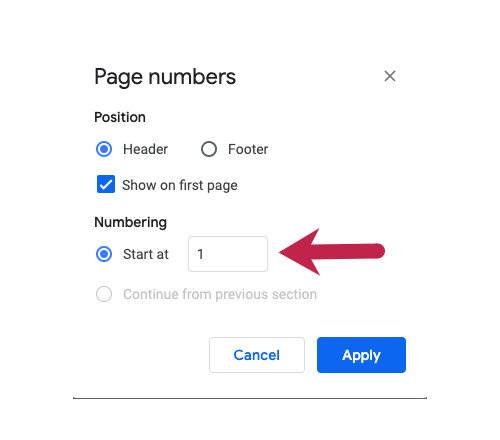
Type the page number that you would like the header to start at in the text field next to “Start at.”
How to remove headers on a Google Doc (desktop)
If you have added a header to your Google document and wish to remove it, follow these steps:
1. Click the “Options” button on the header editing panel.
2. Select “Remove header.”
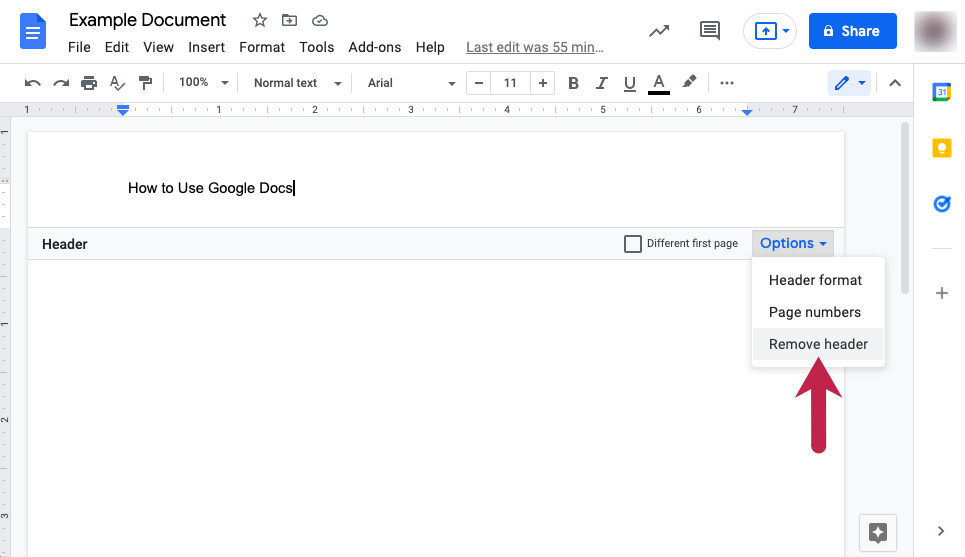
Select “Remove header.”
How to add, close, and reopen headers in Google Docs (mobile)
Follow these steps to add, close, and reopen headers in Google Docs on an Android or iOS device:
1. Open the Google Docs app on your mobile device, and navigate to the document that you would like to add a header to.
2. In the top right of the screen, tap the three-dot icon.
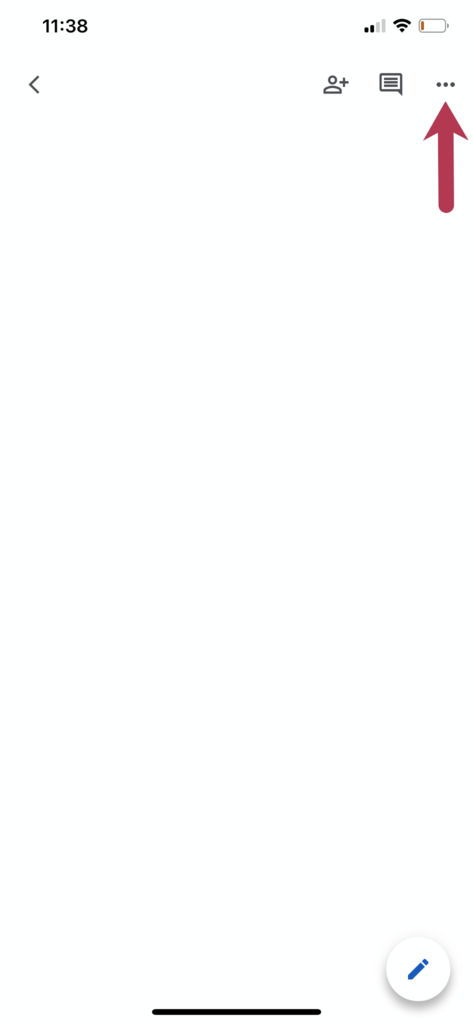
Tap the three dots in the right corner of the screen. If you are using an Android device, the three dots will be vertical rather than horizontal.
3. Tap the “Print Layout” switch once to turn it on (it will turn blue). Your screen will automatically show the header separated from the body of the document.
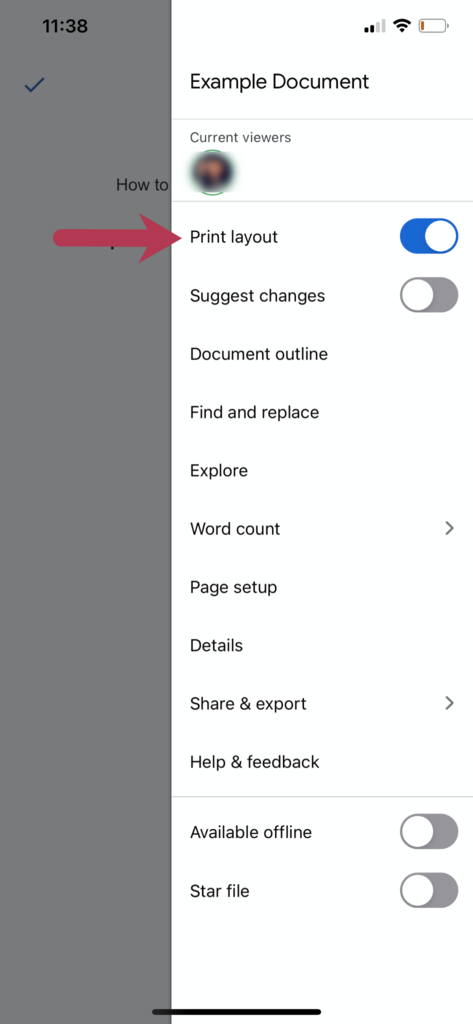
Tap the switch next to “Print layout” once to access the Print Layout screen.
4. Tap the top of the document to add a header to your document.
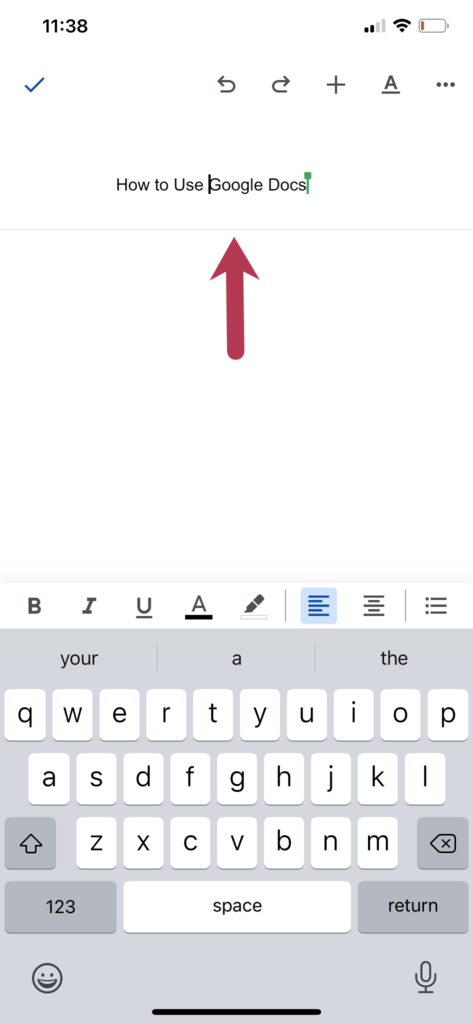
Tap the top of your document to add a header.
5. Type your header text, then click any part of the document outside of the header to save and close.
6. To reopen the header, simply tap the top part of the Google document.
How to a customize and remove headers from a Google Doc (mobile)
The process of customizing and removing the header from a Google Doc on an iOS or Android device is much different than completing this process on a desktop.
How to customize headers on a Google Doc (mobile)
Follow these instructions to customize headers on a Google Doc using a mobile device.
Modify the margins
1. Open your Google Doc and tap the three dots in the right corner of the screen.
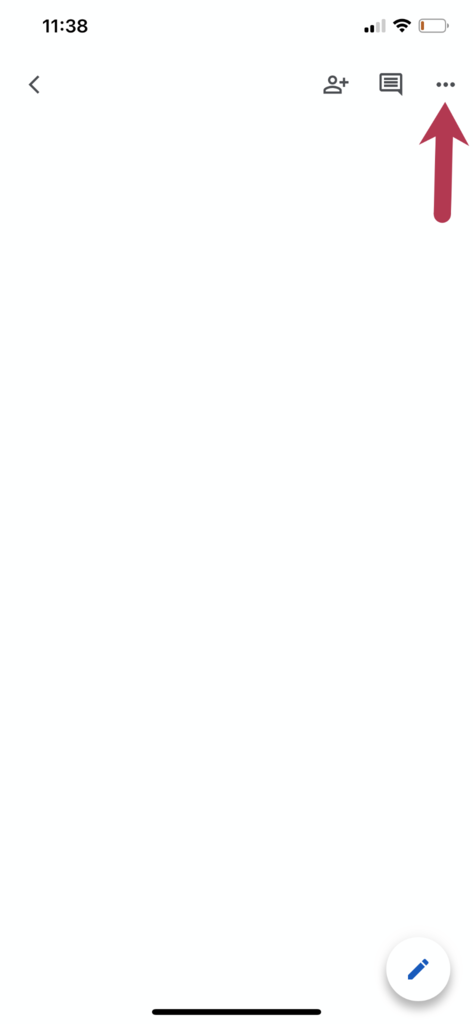
Tap the three dots in the top right corner of the screen. On an Android device, these dots will be vertical instead of horizontal.
2. Tap “Page setup.”
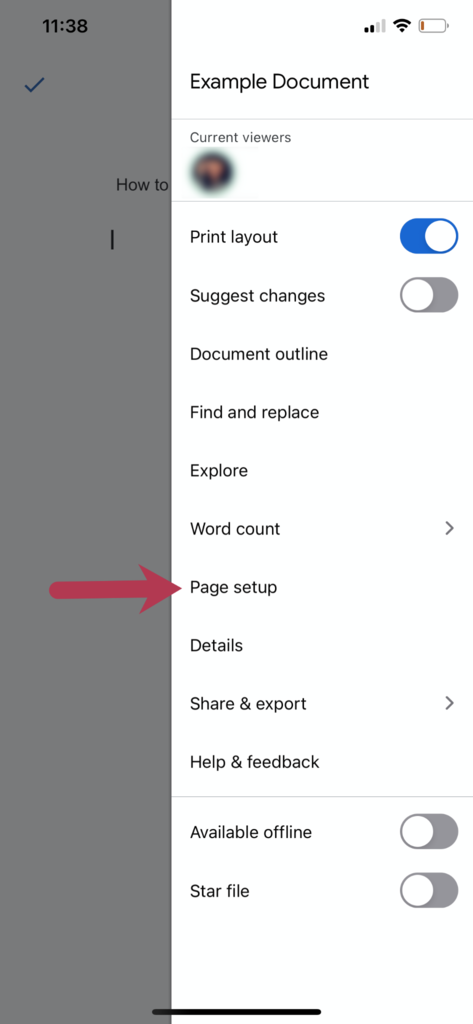
From the panel on the left side of the screen, select “Page Setup.”
3. Select “Margins.”
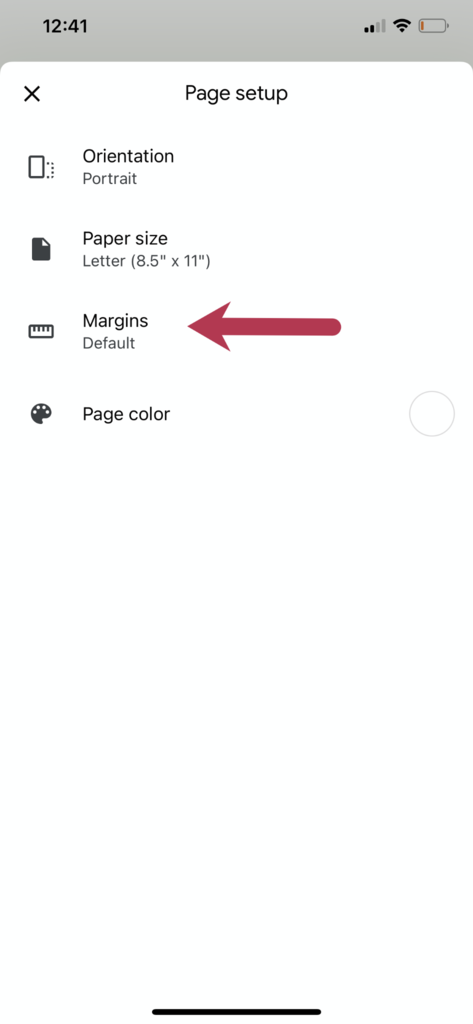
From the menu, tap “Margins.”
4. Press “Custom.”
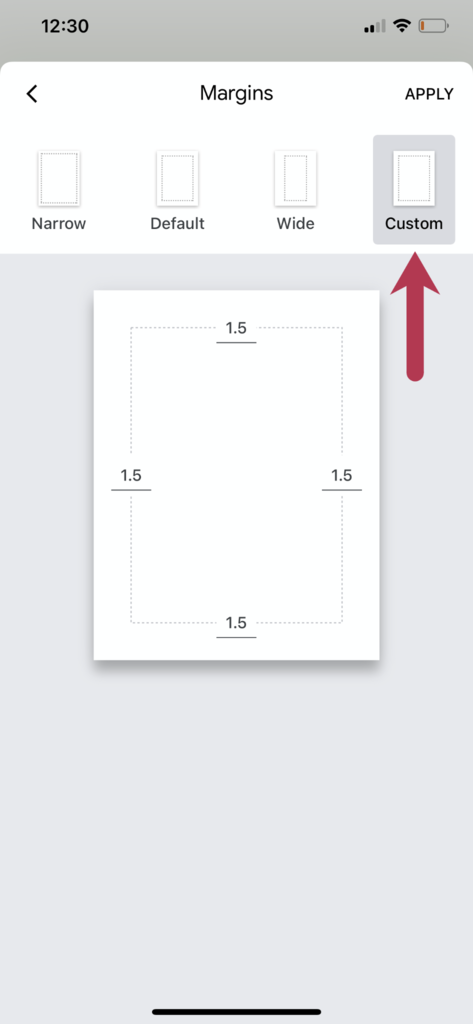
On the menu at the top of the screen, click the “Custom” margins option.
5. Tap the top margin height space, and type the height you would like your header to be.
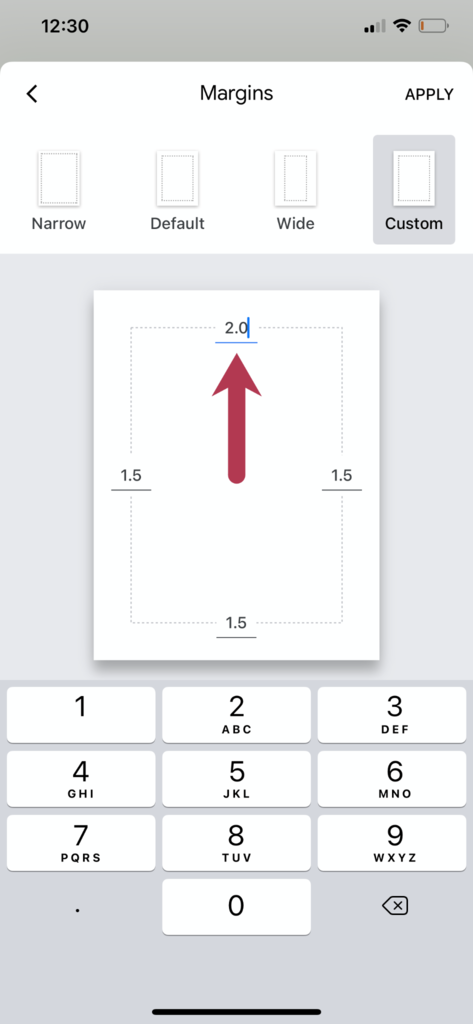
Tap the margin height space at the top of the document, then type the header height you desire.
6. Tap “Apply” in the upper right corner.
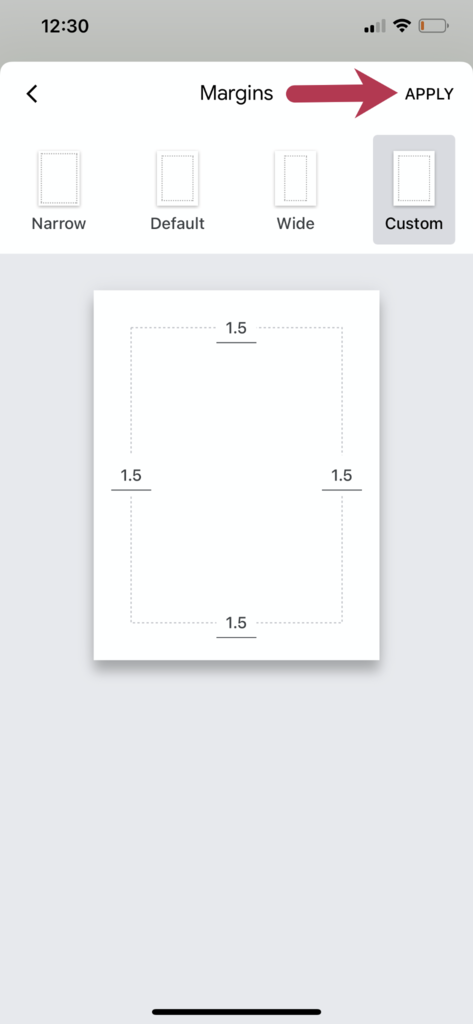
At the top right corner of the screen, tap “Apply.”
Add page numbers to a header
1. Open your Google Doc, and tap the pencil icon.
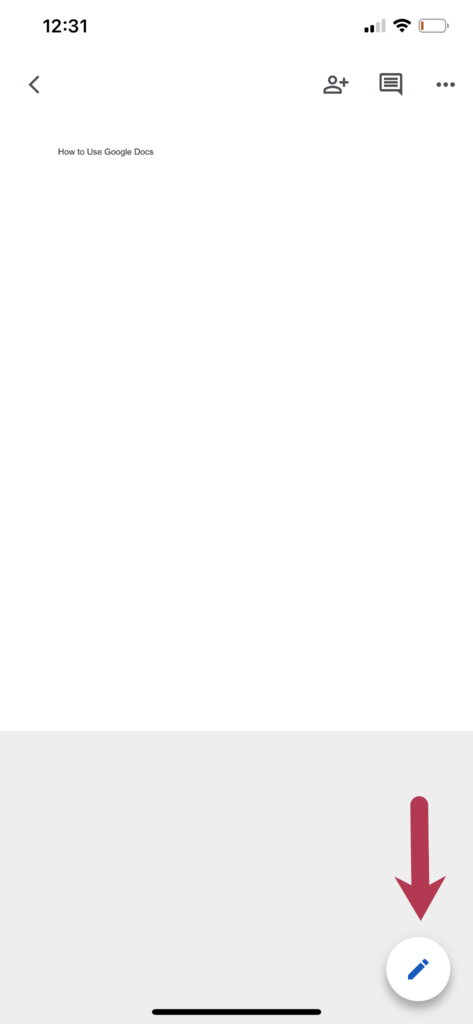
Tap the pencil icon to open Edit Mode.
2. Tap the “+” icon.
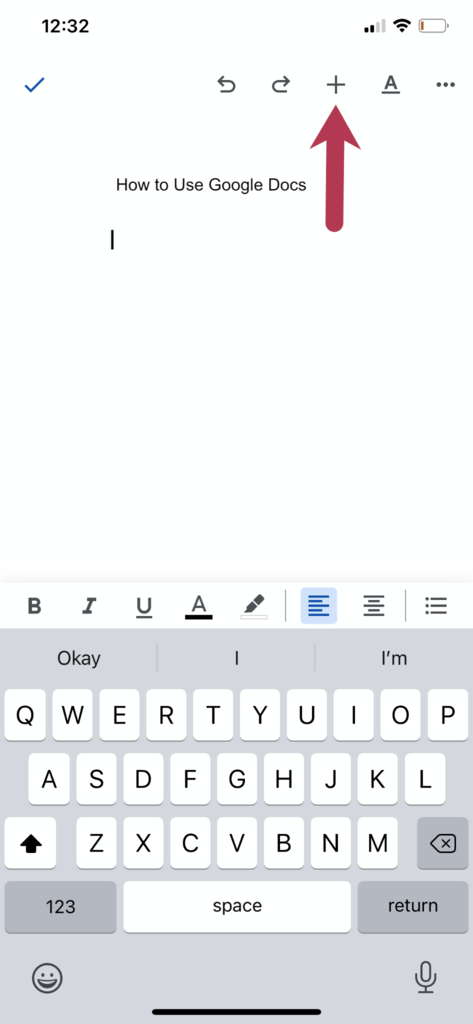
Tap the “+” icon at the top of the screen.
3. Select “Page number.”
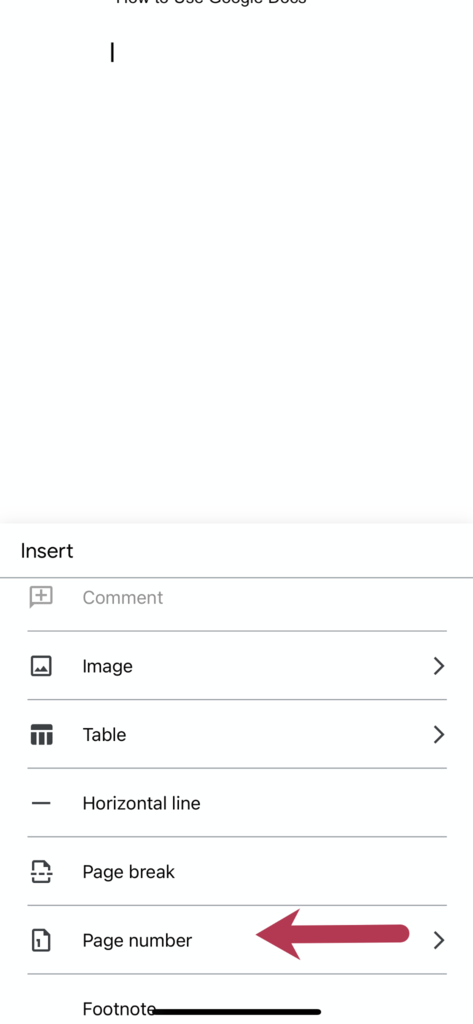
From the menu, select the “Page number” option.
4. Tap the page number set up that you would like to apply to your document.
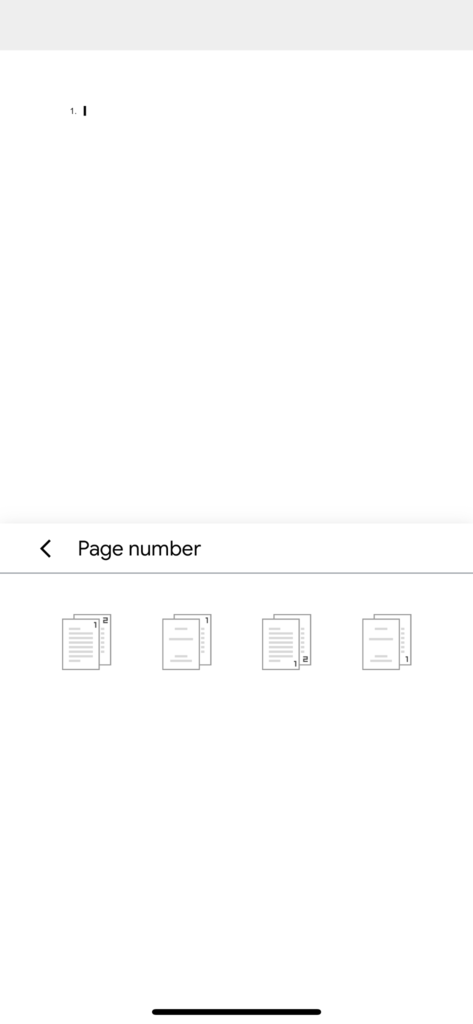
Tap the page number set up you would like to apply to your document. An editable default page number will appear on the screen.
Assign headers to different pages (mobiles)
The Google Docs application for mobile devices does not allow users to assign headers to different pages. To access this feature, you must open Google Doc in your web browser on a desktop computer.
How to remove headers from a Google Doc (mobile)
Unfortunately, the Google Docs application for mobile devices does not have a “Remove header” feature. However, you can still remove a header from a Google Doc on a mobile device by following these easy steps:
1. Open your document, and click the pen icon to open Edit Mode.
2. Triple tap your header to select it.
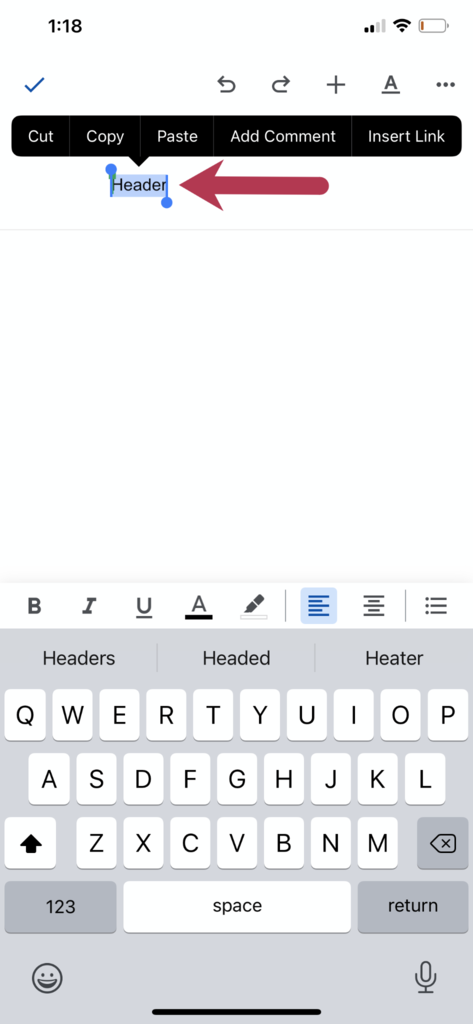
Triple tap the header text on your Google Doc to select it.
3. Tap the backspace button, then tap the checkmark to save.
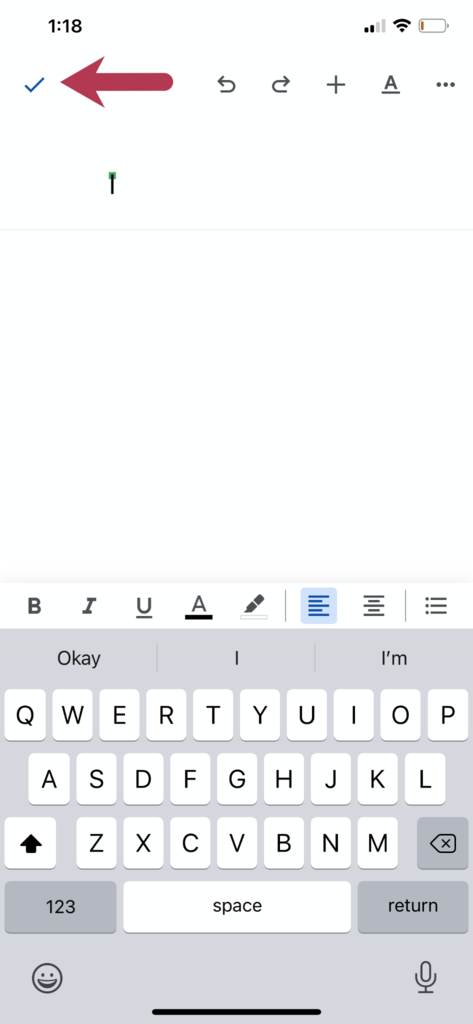
Tap the checkmark to remove your header.
Discover the best authoring tool for your organization
Now that you know how to add and remove headers on a Google doc, consider using this organizational technique to create documentation for your company’s training processes. However, if you are creating more complex training materials for your organization, such as an employee onboarding course, you may want to consider other software solutions that incorporate engaging interactive elements. Check out this article on the 5 Best E-learning Authoring Tools for Corporate Trainers.
The steps to “How to Add and Remove a Header in Google Docs” were researched in October 2021, and the screenshots reflect the app layout on an iOS or Android device and desktop. Applications and layouts are liable to change; see the Google Doc Help Center for additional information.