How To Use Google Docs Outline: A Step-by-Step Guide
The Google Doc outline tool allows readers to easily navigate lengthy documents by organizing a document’s main points into one centralized location. Using a Google Doc outline also provides writers with the opportunity to see the “big picture” of a document, which makes organizing the contents of a dense paper a breeze.
Create an outline for a Google Doc (desktop)
Follow these simple steps to create a new outline:
Adding headings
1. Open your Google Doc, and break your document into sections by pressing the “Enter” button on your keyboard.
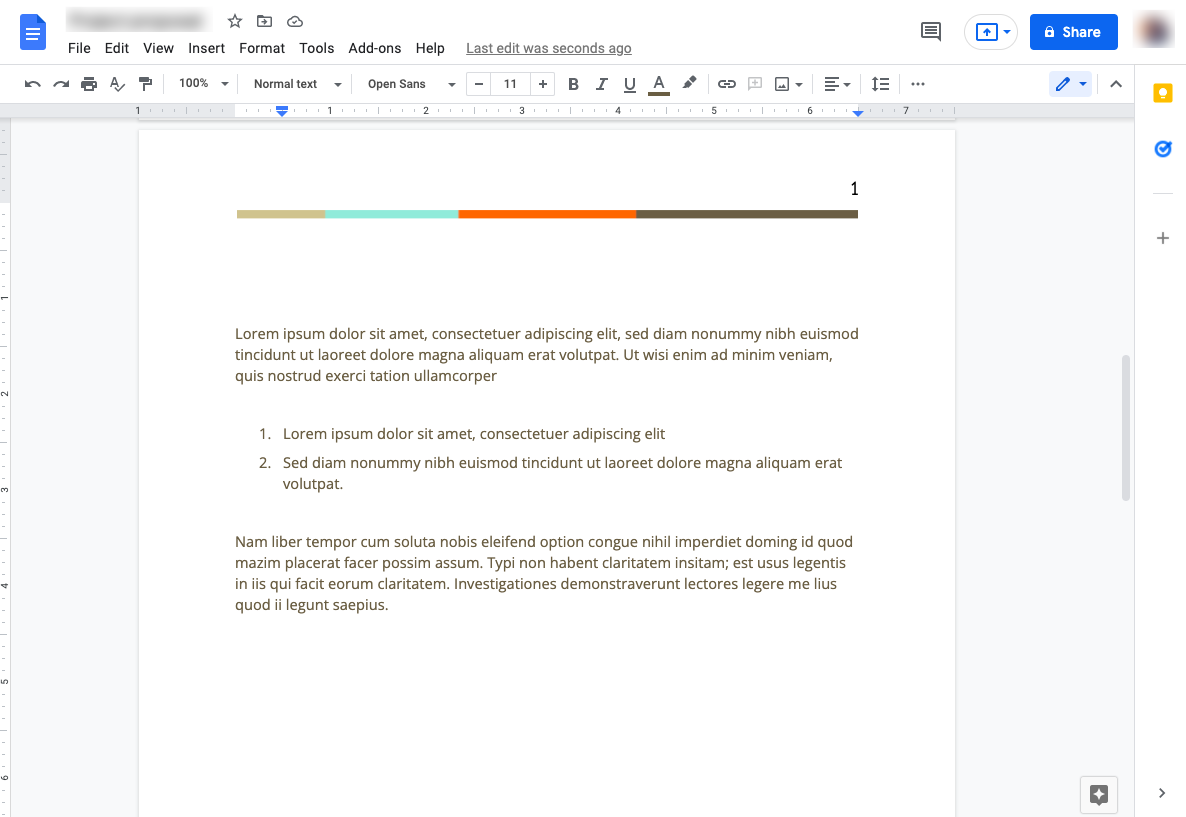
If you haven’t already, break your documents into sections logically. Place your cursor after the last sentence of a paragraph and press the “Enter” button to isolate this section from other paragraphs. Source: All screenshots are taken by the author.
2. Name each section of your document with a brief, yet appropriate heading.
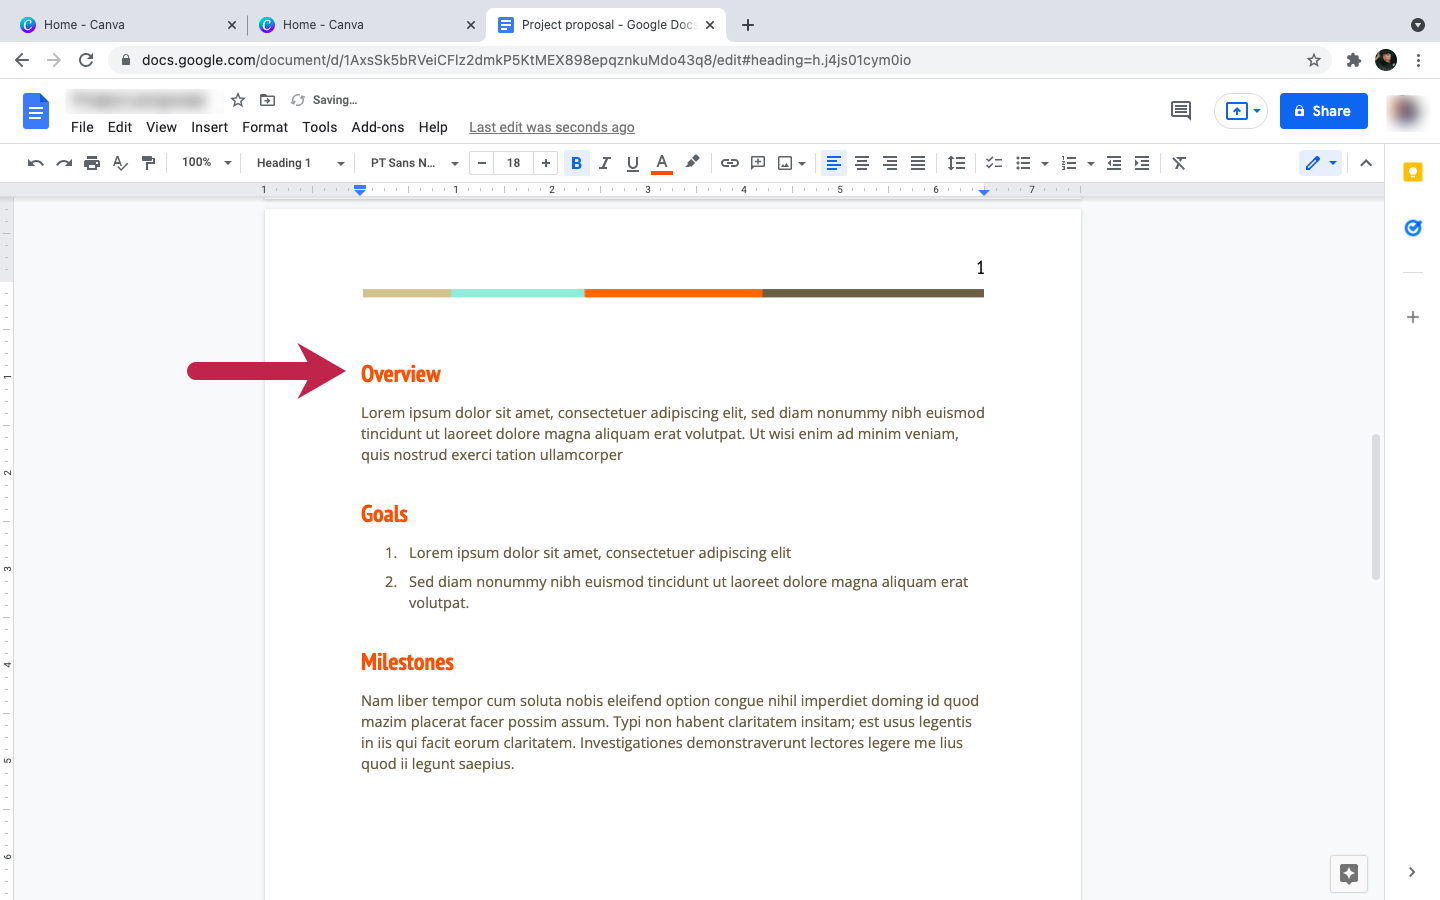
Give each section an appropriate name. This is called a section header. Remember these headers will make up the bulk of the outline.
3. Since this heading is in normal text (which will not display on the outline), you must apply a header style to add it to the outline. Use your cursor to highlight the heading.
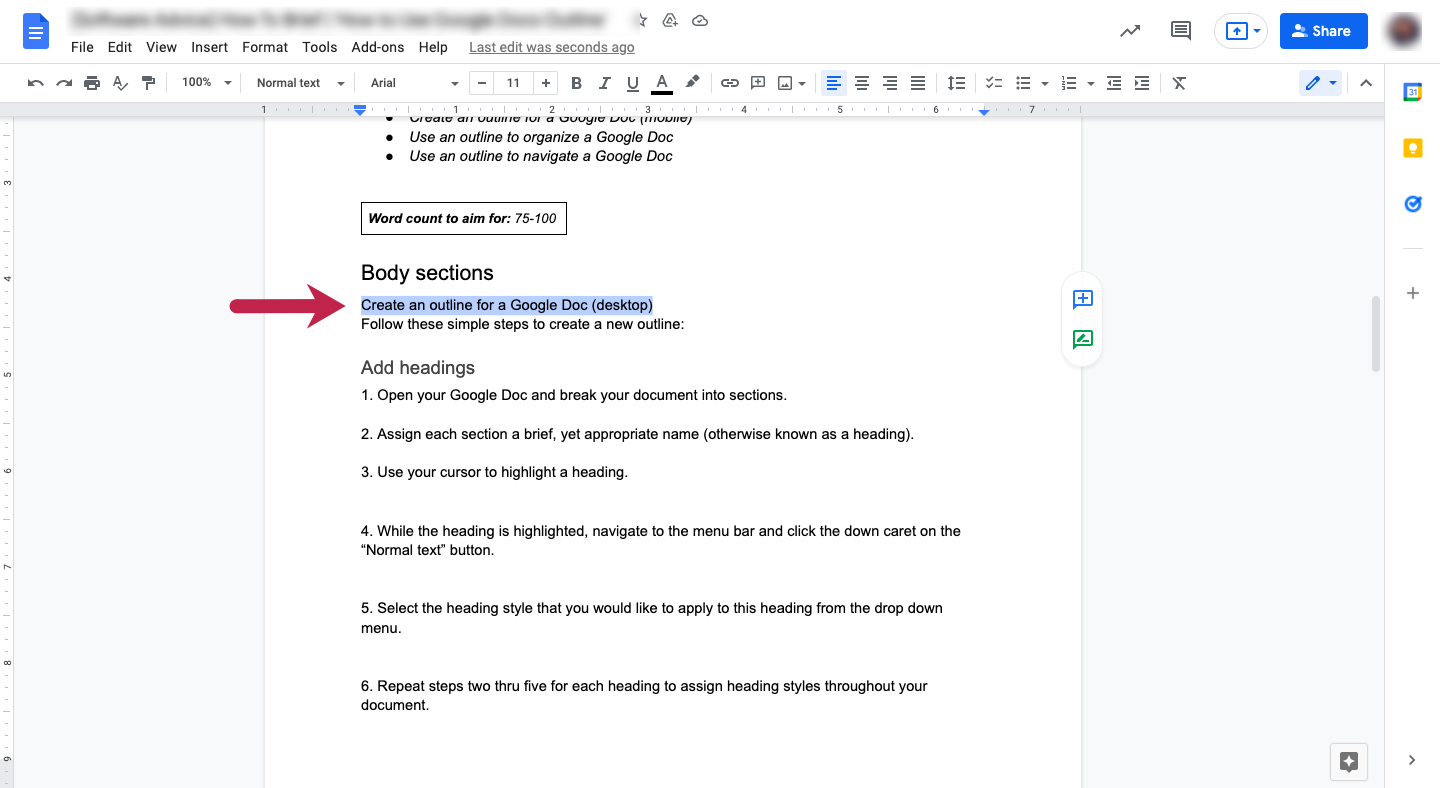
Highlight the heading you would like to format.
4. While the heading is highlighted, navigate to the menu bar, and click the down caret next to “Normal text”.
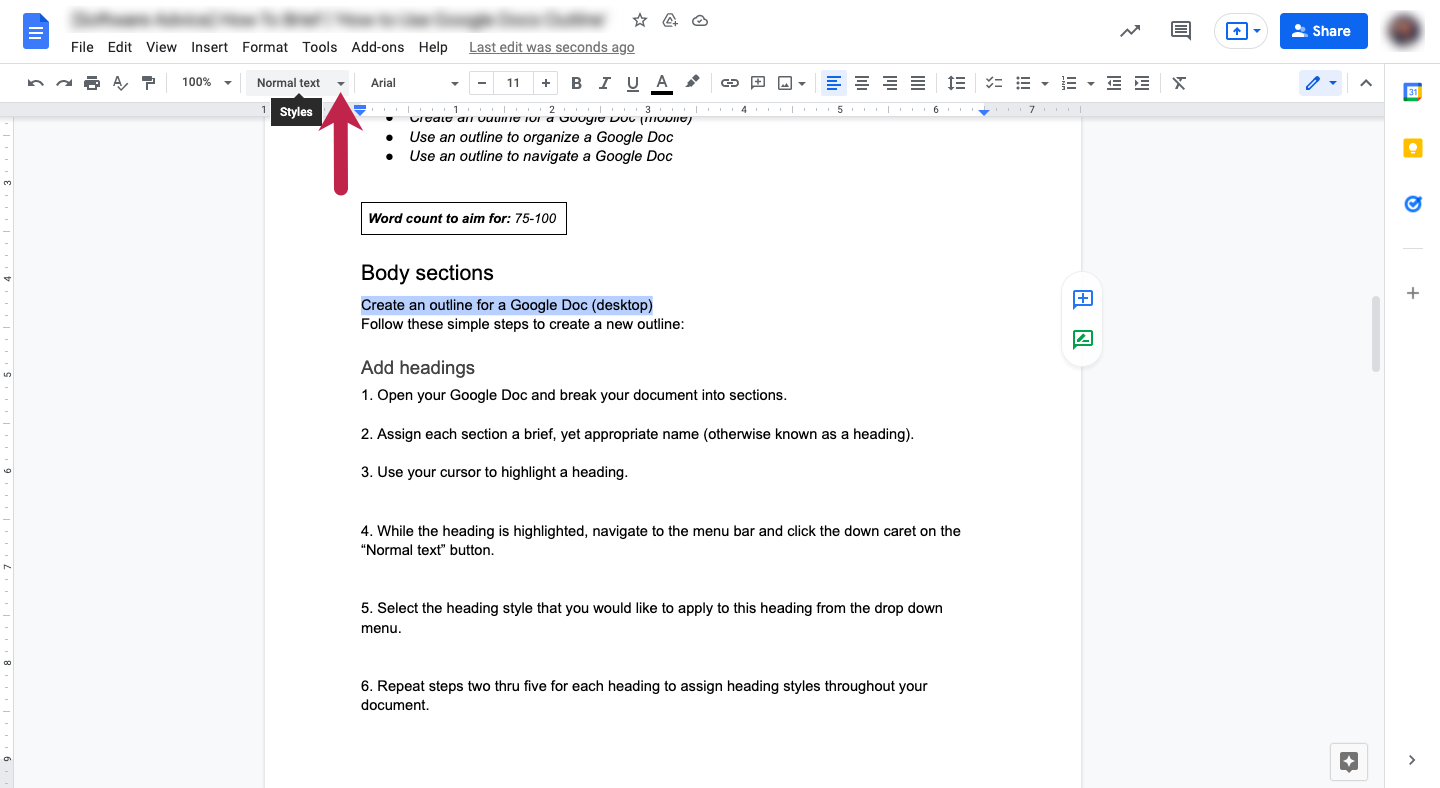
Select the down caret next to the “Normal text” to reveal heading style options.
5. Select the heading style that you would like to apply to this heading from the drop-down menu.
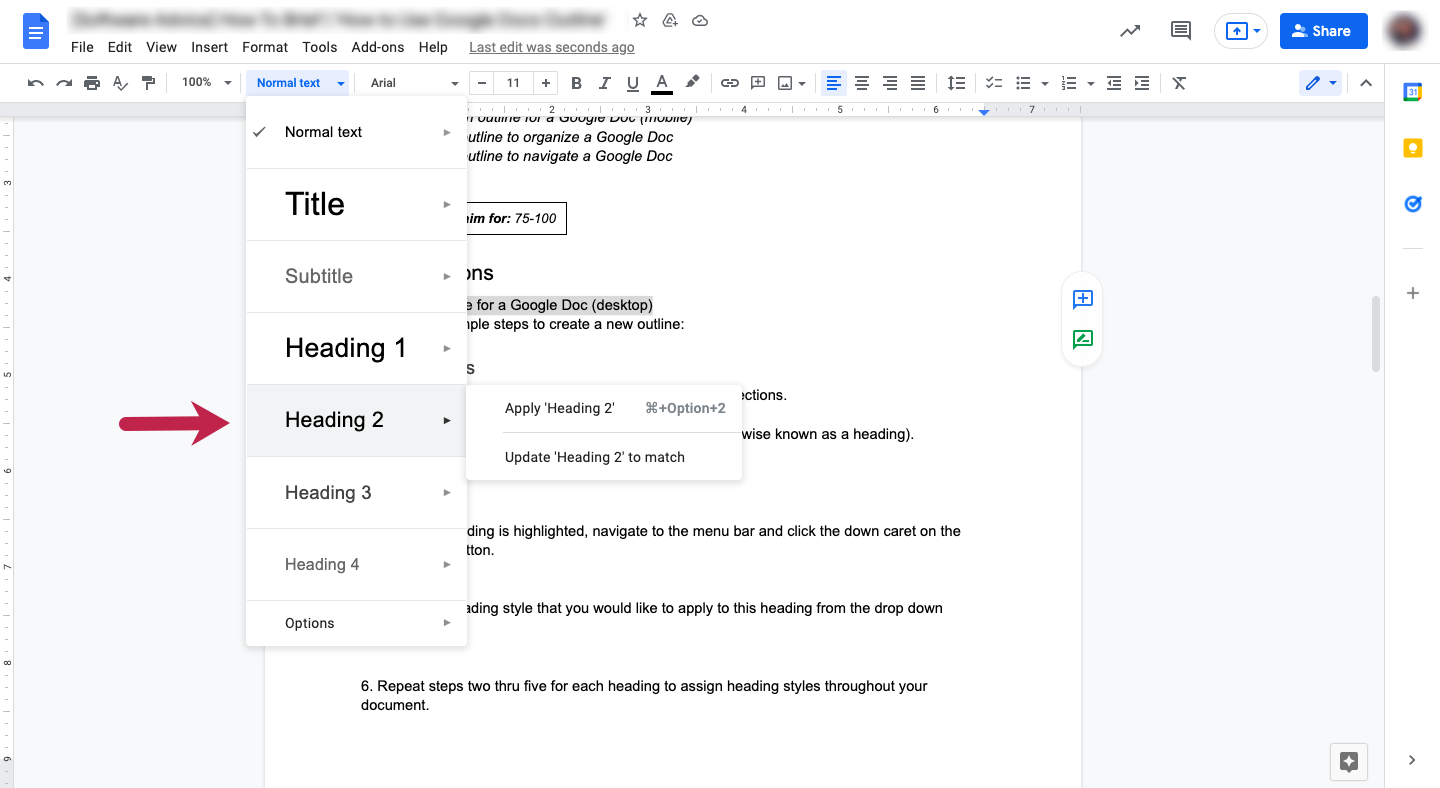
Select the appropriate heading style from the drop-down menu.
6. Repeat steps two through five for each heading to assign heading styles throughout your document.
Opening the outline panel
The outline for a Google Doc will appear on the left side of the screen when opened. This way, both writers and reviewers can easily view and jump to each section of the document.
1. On the top menu, click “View.”
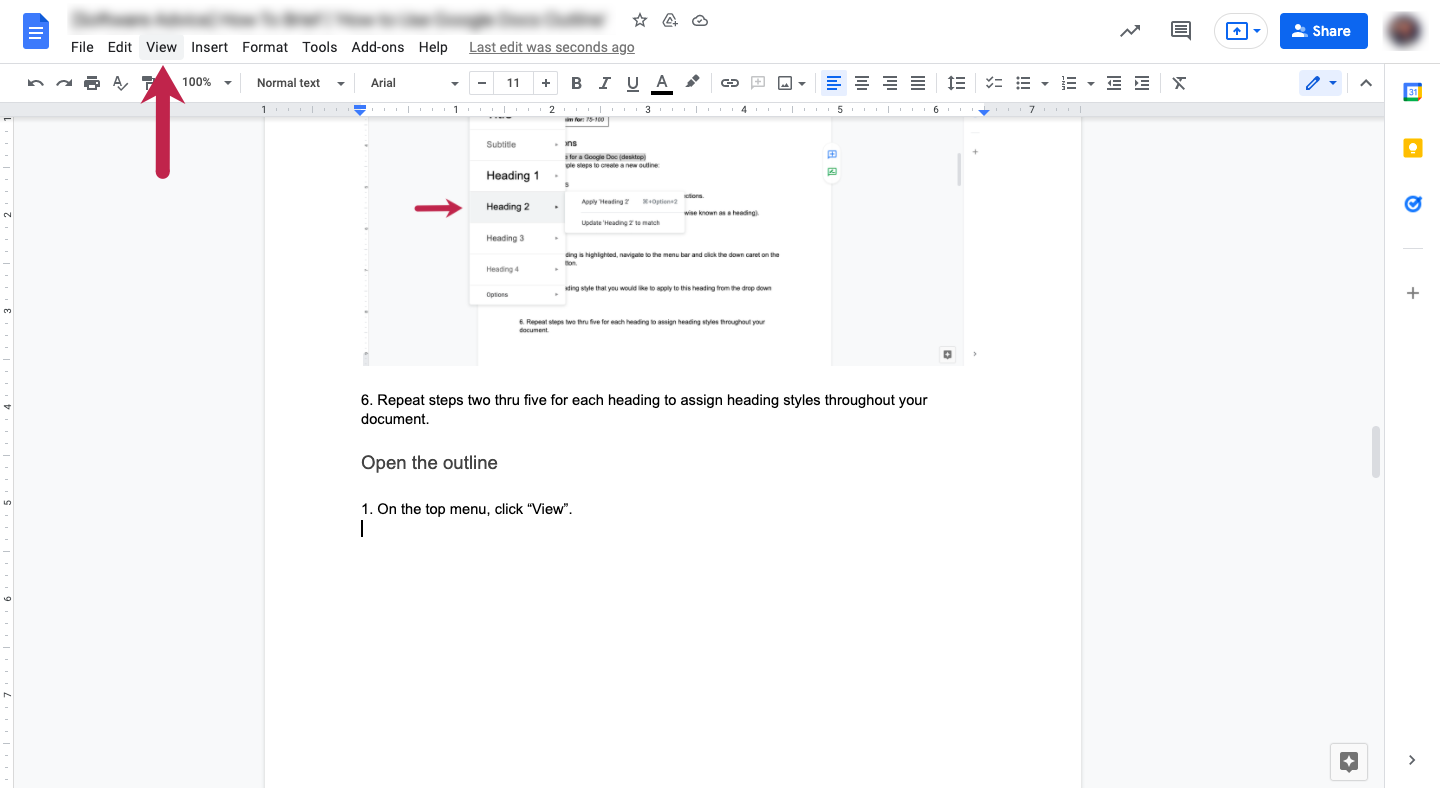
On the top menu bar, select “View”.
2. Select “Show document outline” from the drop-down menu. Your outline will appear along the left side of the screen.
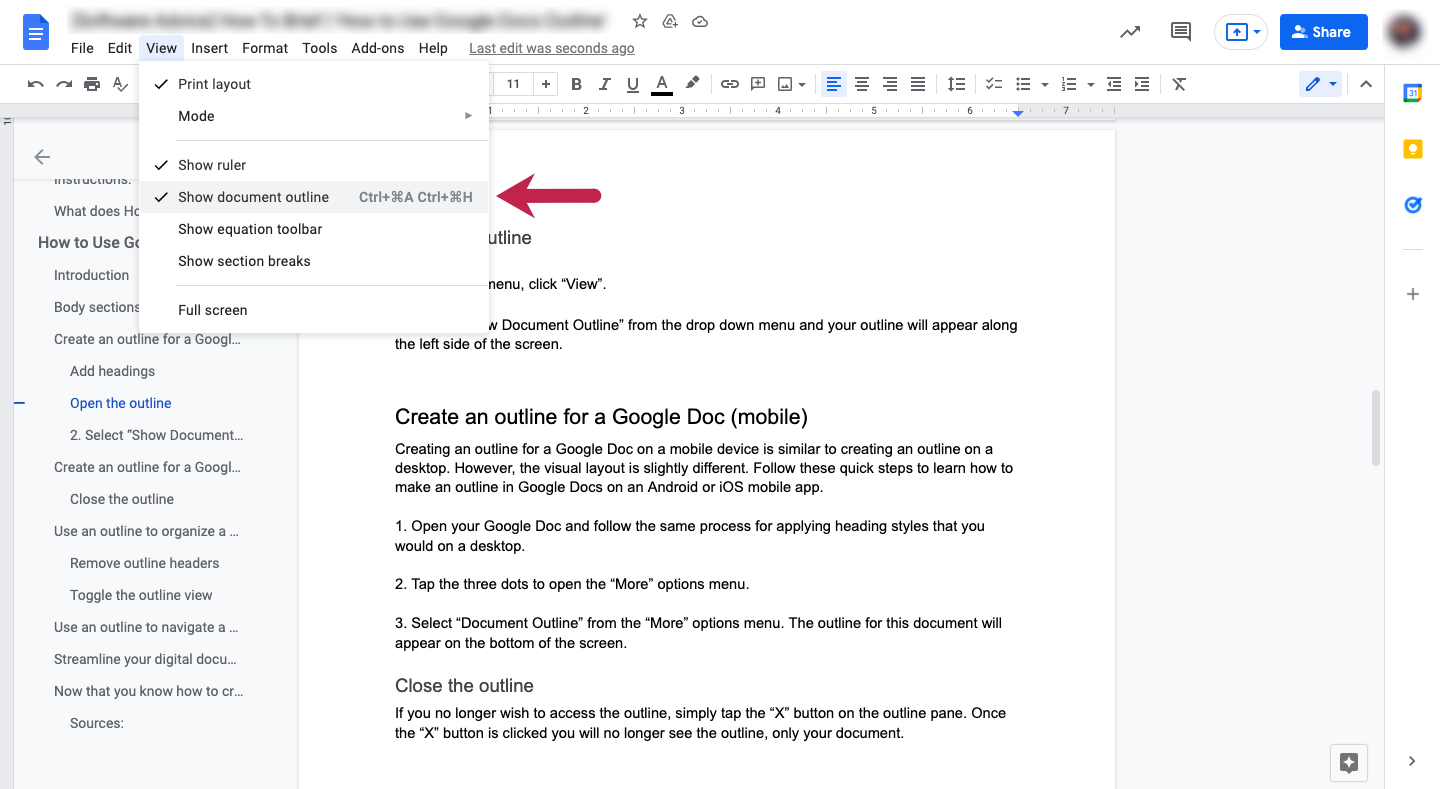
Select “Show document outline” from the drop-down menu.
Create an outline for a Google Doc (mobile)
Creating an outline for a Google Doc on a mobile device is similar to creating an outline on a desktop. However, the visual layout is slightly different. Follow these quick steps to learn how to make an outline in Google Docs on an Android or iOS mobile app.
Adding headings
1. Open your Google Doc in the Google Docs app on your mobile device.
2. Select the pencil icon to open Edit Mode.
3. Triple tap the text you want to add to the outline as a heading.
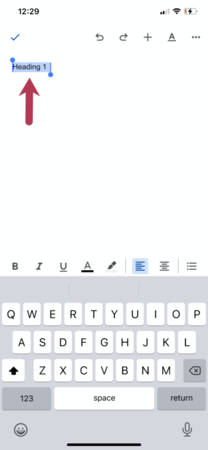
Triple tap the text to select it.
4. Tap the “Format” button at the top of the screen.
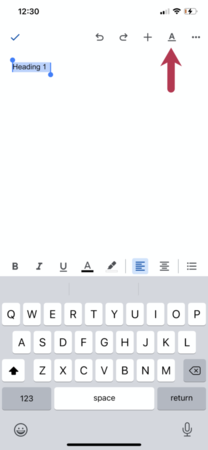
Tap the “Format” button (that looks like an A with a line under it) to open text formatting options.
5. Tap “Style.”
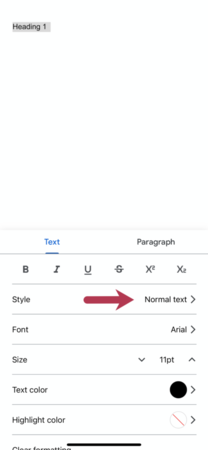
Tap “Style” to reveal heading style options.
6. Choose a style of heading to apply then click the back arrow to save.
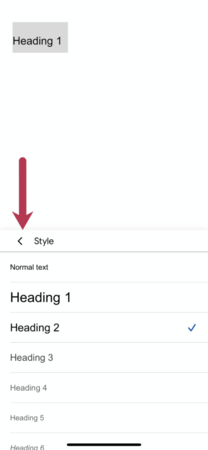
Select the heading of your choice, then click the back arrow to save.
Open the outline panel
While still in the Google Docs app on your mobile device, take the following steps to open your outline panel:
1. Tap the three dots to open the “More” options menu.
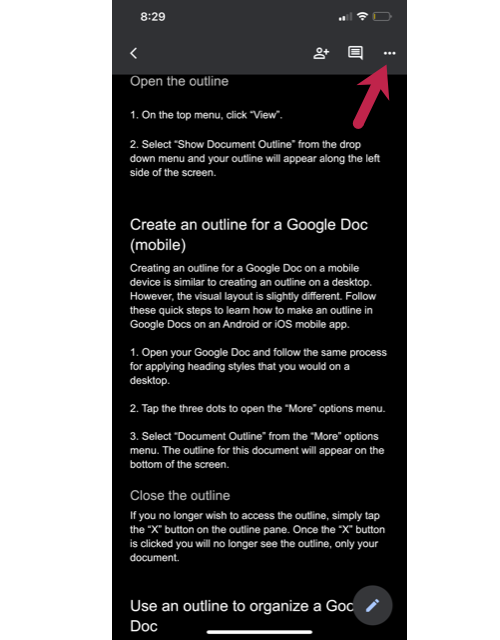
Tap the three dots in the upper right corner of the screen to open the “More” options menu.
2. Select “Document outline” from the “More” options menu. The outline for this document will appear on the bottom of the screen.
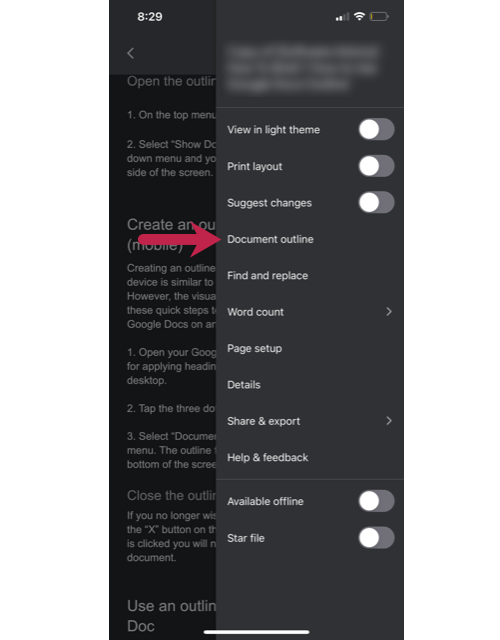
From the menu on the left side of the screen, tap “Document outline” to open the outline.
Close the outline
If you no longer wish to access the outline, simply tap the “X” button on the outline pane. Once the “X” button is tapped, you will no longer see the outline.
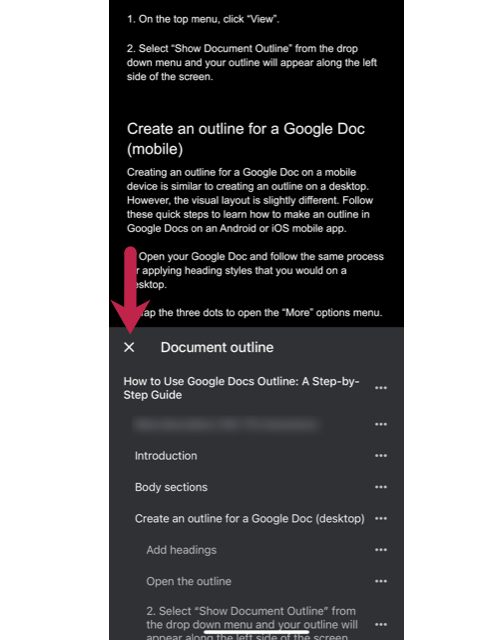
Tap the “X” button on the document outline window to close the outline.
Use an outline to organize a Google Doc
The Google Docs outline feature helps writers manage the organization of their document by allowing them to easily remove headers and toggle their outline view. Follow these instructions to make organizing your document easier on a desktop or mobile device.
Remove outline headers
A cluttered outline will only confuse the readers of the document. Make your outline more scannable by removing unnecessary headers. Follow these steps to remove outline headers: (Note: For mobile devices, skip directly to step two.)
1. Navigate to the Google Doc outline, and hover your cursor over the heading you wish to remove. An “X” will appear next to the heading.
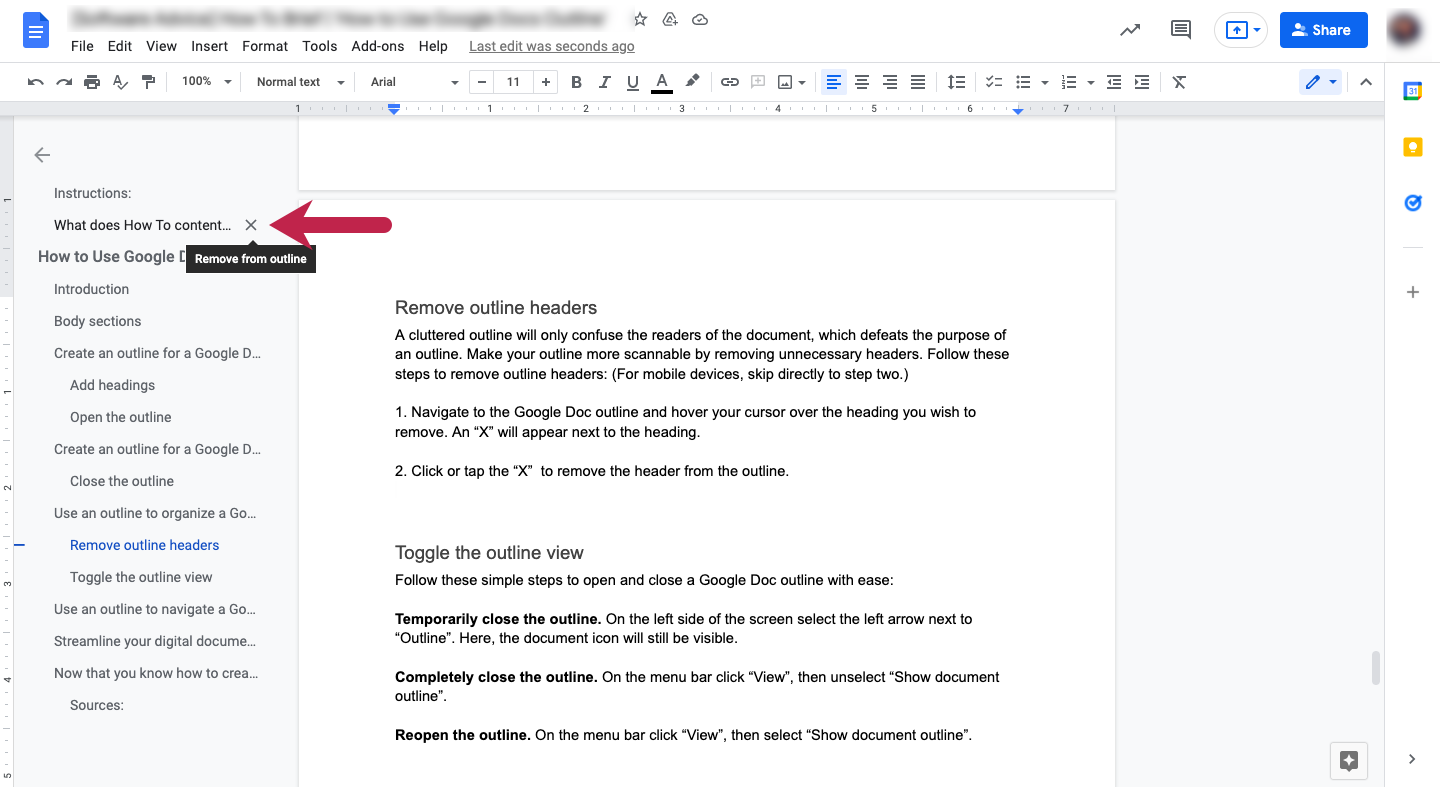
Hover your cursor over a heading on the outline to reveal the “X.” Here we are using a desktop to show you how to remove a header from the outline.
2. Click or tap the “X” to remove the header from the outline.
Toggle the outline view
To open and close a Google Doc outline with ease, follow these helpful tips:
Minimize it. On the left side of the screen, select the left arrow next to “Outline.” Here, the outline icon will still be visible.
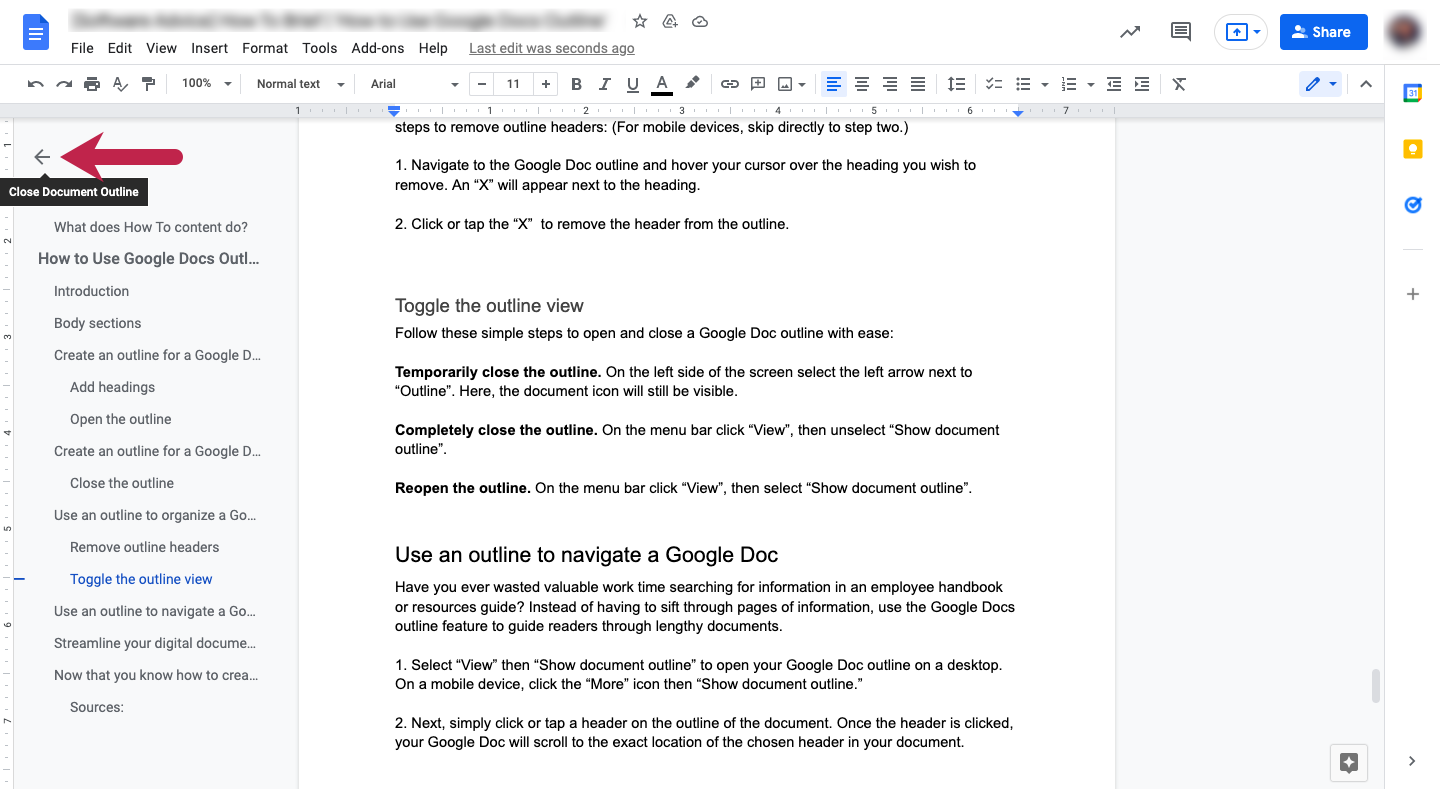
To minimize the outline, click the left facing arrow on the Google Doc outline.
Completely close it. On the menu bar, click “View,” then unselect “Show document outline.”
Reopen it. On the menu bar, click “View,” then select “Show document outline.”
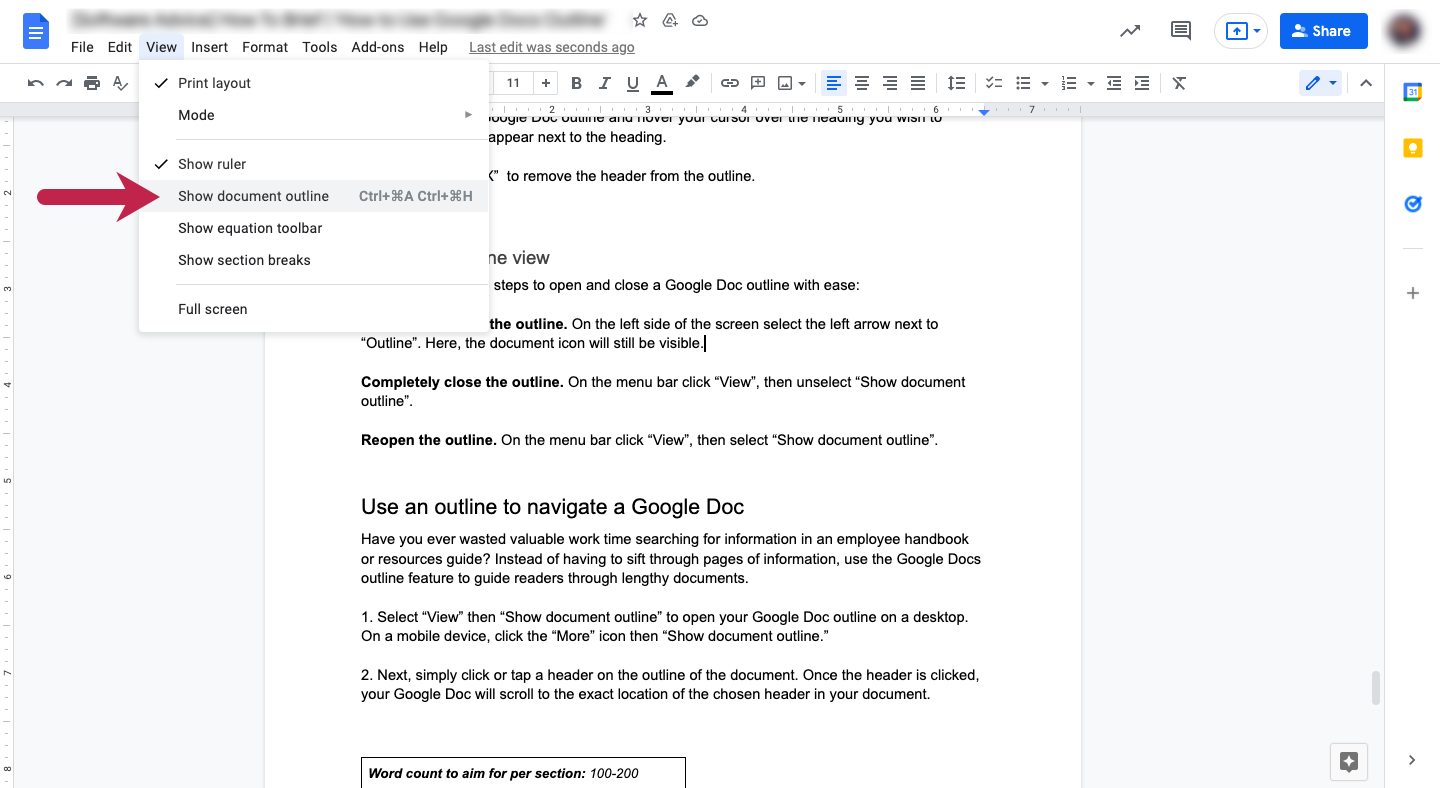
Select “View” from the top menu bar, and click “Show document outline” to show the full outline.
Use an outline to navigate a Google Doc
Have you ever wasted valuable work time searching for information in an employee handbook or resource guide? Instead of sifting through pages and pages of information, follow these simple steps to use the Google Docs outline feature, which will guide readers through lengthy documents.
1. Select “View” then “Show document outline” to open your Google Doc outline on a desktop. On a mobile device, click the “More” icon then “Show document outline.”
2. Next, simply click or tap a header on the outline of the document. Once the header is clicked, your Google Doc will scroll to the exact location of the chosen header in your document.
Streamline your digital documentation processes
With the outline feature of Google Docs, you can create comprehensive, yet simple-to-navigate documents (such as company policies, employee handbooks, orientation materials, and training materials), and streamline the way your organization writes and reviews digital documentation. To further modernize your organization’s digital documentation processes, check out this list of the top remote work software solutions.
The steps to using an outline on Google Docs were researched in November 2021, and the screenshots reflect the app layout on an iPhone and desktop computer. Applications and layouts are liable to change; see Google Doc Help Center for additional information.