7 Steps to Close Your Accounting Books Like A Pro
Closing the books at the end of an accounting period is critical for any business. Typically, businesses close the books at least once a year to file income tax returns and prepare financial statements.
While most businesses rely on accountants to handle the closing process, it pays to stay in the know of things to keep control of your finances. A disorganized accounting close can lead to unnecessary delays in closing activities, inaccurate financial reports, and hefty fines by regulatory authorities.
If you’re an owner or an accountant at a small firm looking to optimize your financial closing process, you can find a lot to learn from Gartner's research on the characteristics of companies with a fast accounting close [1]. Supplemented by expert advice from an experienced ACCA-qualified accountant Sandeep Gill [2], also the owner of a UK-based accounting firm, we crunch down the essentials of book closing in this article to help you achieve a faster and more efficient close.
Sandeep Gill
ACCA-qualified accountant and owner of Compare the Accountant
What is book closing in accounting?
Book closing is the process of making sure your financial records are up-to-date and correct, and that you’re ready to generate reliable financial statements. Financial statements include balance sheets and profit and loss (P&L) statements, among other documents, which allow internal management and external stakeholders (such as investors and lenders) a clear view of just how the business performed financially in a given period. Think of book closing as a big puzzle, where all the money you earned and spent should be put in the right places.
Closing the books is all about the completeness and accuracy of your financial records. While the close process will be specific to the needs of your small business and the level of automation and support provided by your accounting software, here’s a general outline of seven steps that are applicable to all book-closing tasks.
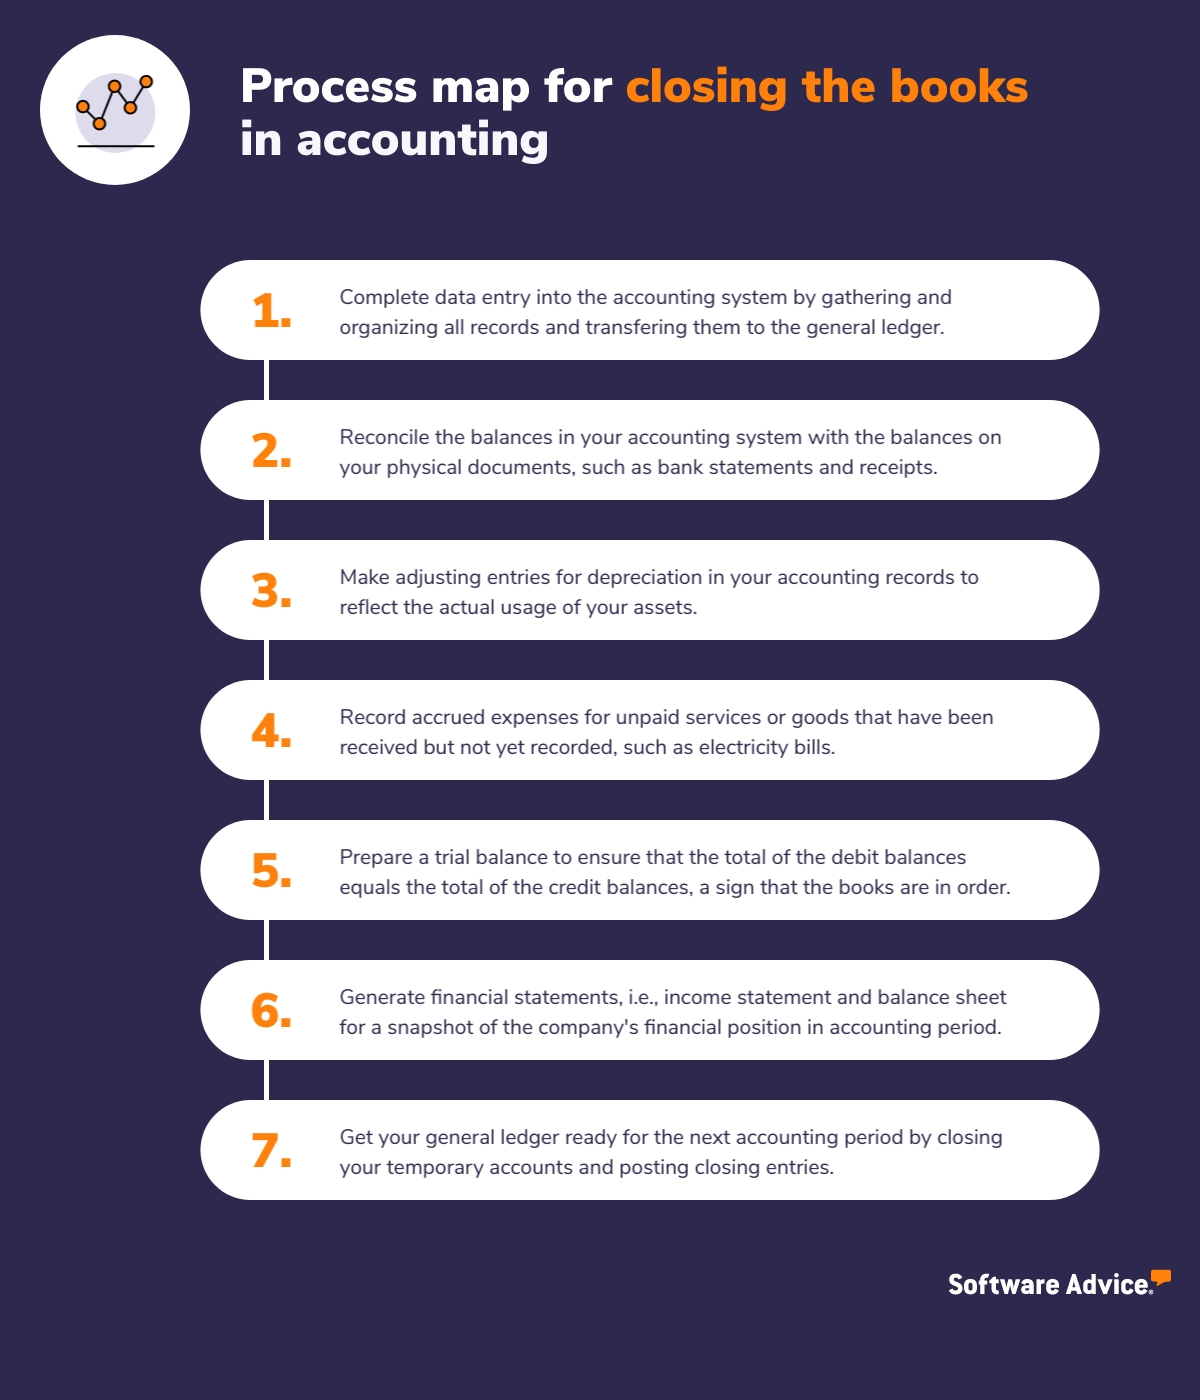
Process map for closing the books in accounting
Step 1: Complete data entry into the accounting system
Closing starts with the preparation period, where all the records are gathered, organized, and ready to be reviewed. Business transactions are first recorded in a journal (such as a sales or purchase journal) in chronological order. Then, they are posted to general ledger (GL) accounts, a master account that contains all the accounts used by a business, such as sales, cash, and accounts receivable (AR).
As a first step, make sure that all the financial records are added to your accounting system. Gartner research finds that most fast-closing organizations had less than 40% of journal entries done manually [1].
Manual entries are a substantial time investment for close teams, considering the volume of them. The total number of manual journal entries can be reduced by automating journal entries and eliminating the entries with materiality thresholds (such as avoiding manual entries of amounts below $100).
– Gartner [1]
Pro tip
Cut time spent manually entering data by using a spend management solution. By automating the collection and recording of all company expenses, such as card payments and invoices, and integrating them with your accounting system, you can save on labor and make sure your financials are updated in real time.
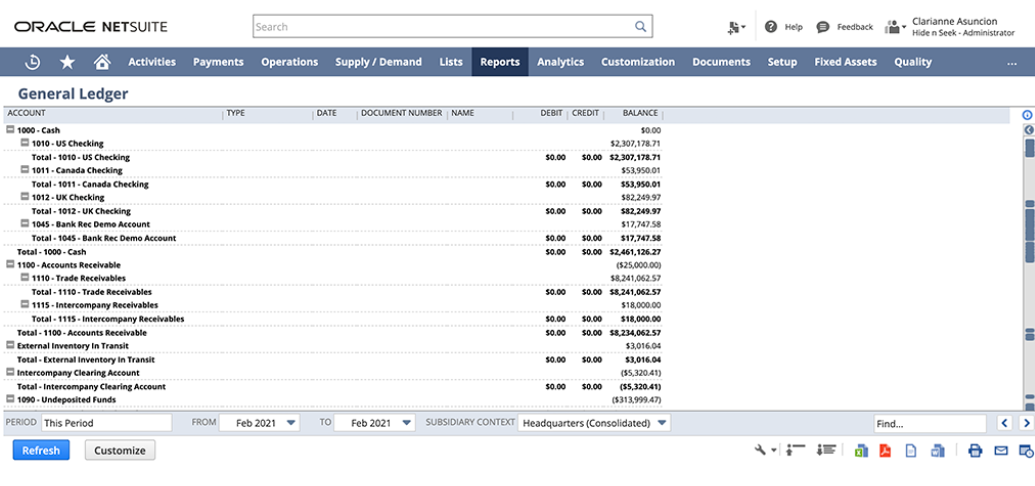
General ledger in accounting software (Source)
Step 2: Reconcile cash, bank, and other accounts
Once journal entries are posted to the general ledger, review the data to ensure accuracy. If a transaction is missed or recorded twice, there will be inaccuracies in your accounts. Therefore, you need to reconcile your books to ensure accurate data recording.
This step involves checking the balances in the accounting system with the balances on your physical documents, such as bank statements and receipts. Identify, process, and correct any discrepancies and adjustments. Here are some common accounts you’ll need to reconcile:
Cash account: Make sure the cash account balance in GL matches the cash available on hand or in the bank.
Bank accounts: Make sure all transactions on your bank statements are accounted for in the accounting system and match with your documents (such as receipts).
Accounts receivable: Verify that the accounts receivable balance in GL matches with the post-dated cheques received from customers or sales made on credit.
Accounts payable: Verify that the accounts payable balance in GL matches with the post-dated cheques sent to your suppliers or purchases made on credit.
Pro tip
Keep your banking transactions and journal or general ledger entries in sync with bank reconciliation features available in most accounting software. You can enter instructions, such as flagging certain high-value entries for manual review, and let these programs do the rest, from importing bank transactions to matching them with entries in your journal or general ledger, and even suggesting relevant journal entries for future based on the amount and other information from your previous postings.
Learn more about how modern accounting tools can make your processes easier with Software Advice’s accounting software buyers guide.
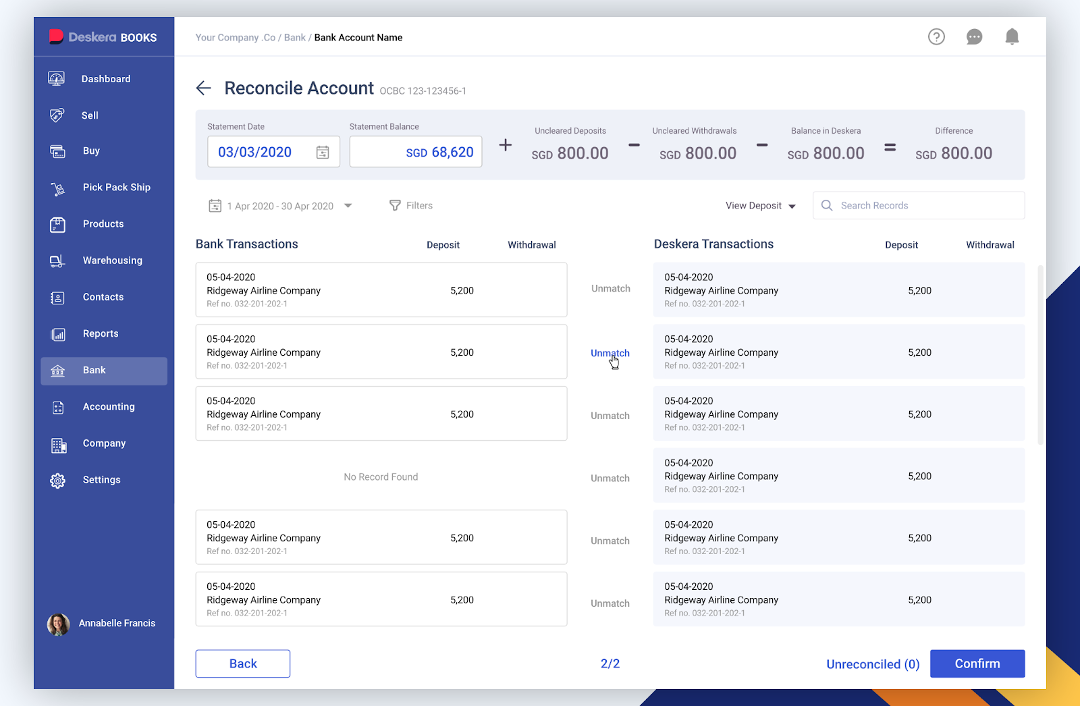
Screenshot of bank reconciliation feature in software (Source)
Step 3: Adjust depreciation
After reconciling your records, you’ll need to make certain adjustments to close your books. Adjusting entries are business expenses that don't usually get recorded in the daily logs, such as depreciation. Depreciation is a non-cash expense that’ll reflect the wear and tear of your company's assets over time.
Make entries to record the depreciation in your accounting records and reflect the actual utility of your assets.
Example of an adjusting entry for depreciation
Say your company purchased a delivery truck for $20,000 that has an expected useful life of five years. This means that you can use the truck for five years before it becomes completely unusable and has no value left.
To account for the wear and tear of the truck over time, you need to record an adjusting entry at the end of each accounting period. Assuming you can’t salvage the value of the truck at the end of five years (by reselling), you can calculate per-year depreciation by:
$20,000 / 5 years = $4,000 per year
Here’s how its adjusting depreciation entry will look:
Account name | Debit | Credit |
|---|---|---|
Depreciation expense | $4,000 | $0 |
Accumulated depreciation (delivery truck) | $0 | $4,000 |
Step 4: Record all accrued expenses
Business activity does not always fit tidily into an accounting period, but you still need to account for all expenses incurred. Adjusting entries are made for such expenses as well.
For example, the electricity bill that’s only received halfway through the next month, or an employee who has worked in the past month but will not be paid until the first week of next month. You will need to accrue all those expenses as they belong to the previous period. These are a few forward-thinking adjustments that make your financial records more accurate and reliable.
Pro tip
In modern accounting systems, you can make adjusting entries, such as accrued expenses and depreciation, in their specific module within the software, and all the changes are updated on the general ledger automatically and even reflected in auto-generated financial statements.
Step 5: Prepare a trial balance
A final check of an accurate and ordered bookkeeping system is the trial balance. It compiles all ledger entries into two columns, debits on one side and credits on the other.
Prepare a trial balance and make sure these totals match up when compared to each other. If they do, you can say that your records are in order. However, if they don't, go back and recheck your records so nothing slips through unnoticed.
Did you know?
Trial balance only verifies the mathematical accuracy of the general ledger. It is still possible for errors to exist in the recording of transactions and classification of accounts, among other things.
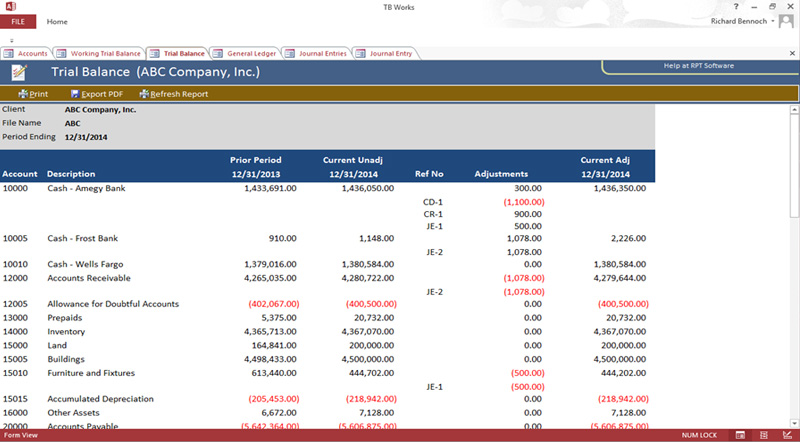
Screenshot of a trial balance generation in software (Source)
Step 6: Generate financial statements
Once you’ve tracked and corrected any errors in the trial balance, you are ready to prepare financial reports, such as P&L statements and balance sheets. These reports will provide an inside look at the business's performance over the accounting period for internal team members and external stakeholders alike.
Pro tip
While accounting software can be sufficient for generating basic financial statements, financial reporting tools can provide an invaluable level of insights for businesses of all sizes. These tools have powerful analytical capabilities, such as ratio analysis, forecasting, and trend analysis, to give you a comprehensive look at your business's fiscal health through customizable dashboards, allowing for more sophisticated reporting.
Step 7: Close temporary accounts
The final step in the close process is to get your general ledger ready for the next accounting period. This involves making closing entries to your temporary accounts, namely revenue and expense accounts, and transferring their balance (net income or loss) to the retained earnings account, which is a permanent account.
Doing this ensures the temporary accounts have a zero balance while updating the permanent accounts with net income or loss. The process of transferring the balance from temporary to permanent accounts is called making closing entries.
For instance, if the total revenue for a period is $10,000 and the total expenses are $8,000, you would create a journal entry to credit the revenue account for $10,000 and debit the expense account for $8,000. The difference, which is $2,000 in this example, would be credited to the retained earnings.
Some best practices of a fast accounting close
Gartner research shows that for every quarter, the fastest 25% of companies close their books in five days, while the slowest can take 11 days or longer [3]. Regardless of how often (monthly, quarterly, or yearly) one closes the books, all high-velocity closes implement similar initiatives.
From the playbook of those fast-closing organizations and Sandeep’s [2] experience, here are some strategies and suggestions for small businesses.
Implement a cloud-based accounting system to manage financial transactions and records, generate financial statements, and provide easy access to financial information to internal stakeholders in real time.
Use a modern enterprise resource planning (ERP) solution to integrate various business functions and provide information across all operations, including finance, inventory management, procurement, sales, and customer relationship management, to accounting.
Push noncritical work outside of the close and reserve the close period for only essential tasks.
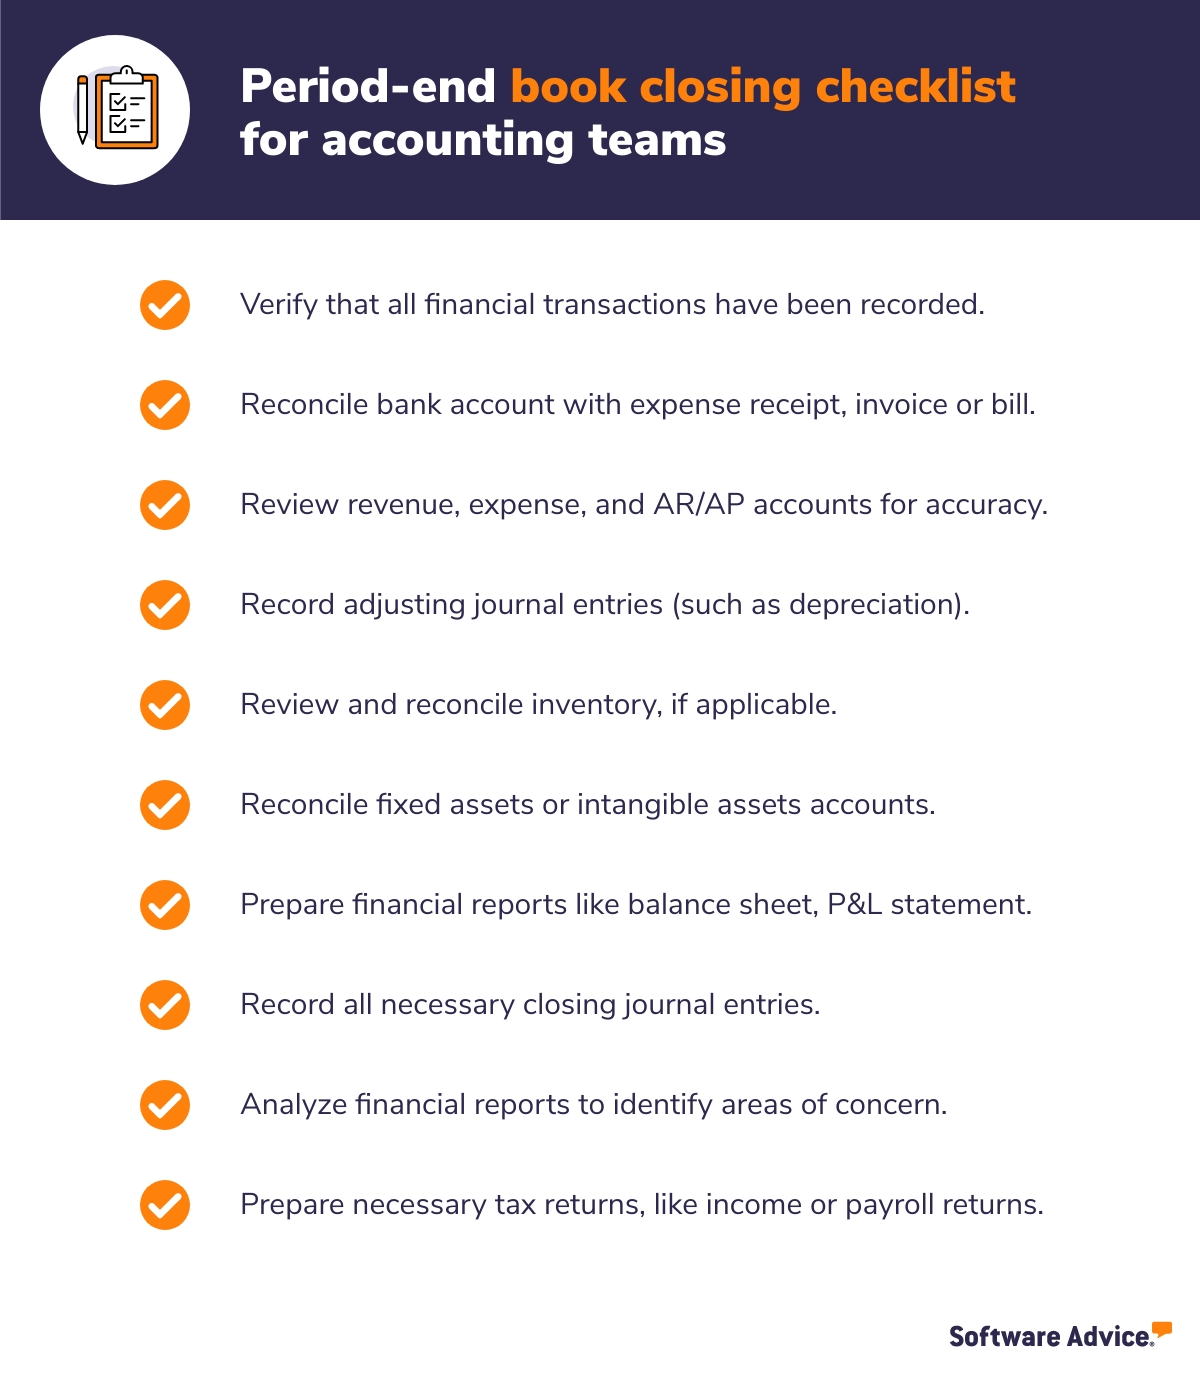
Map your close process and develop a checklist to ensure that all necessary tasks are completed in a timely and efficient manner.
Develop an accounting close checklist and make it work for you
For small businesses to streamline accounting close processes and maximize efficiency, a systematic approach should be implemented. Crafting a checklist of all necessary tasks that need to be performed during the closing process can help ensure you don't overlook any step.
To get started, Sandeep Gill [2] has provided some helpful guidance with a general SMB close checklist that can be tailored to meet your unique business needs.
Note: The applications selected in this article are examples to show a feature in context and are not intended as endorsements or recommendations. They have been obtained from sources believed to be reliable at the time of publication.